Cách tạo FPS với sự hỗ trợ của AI trong Unity
Game bắn súng góc nhìn thứ nhất (FPS) là một nhánh nhỏ của trò chơi bắn súng trong đó người chơi được điều khiển từ góc nhìn thứ nhất.
Để tạo một trò chơi FPS trong Unity chúng ta sẽ cần bộ điều khiển người chơi, một loạt vật phẩm (trong trường hợp này là vũ khí) và kẻ thù.
Bước 1: Tạo Trình điều khiển trình phát
Ở đây chúng tôi sẽ tạo một bộ điều khiển sẽ được người chơi của chúng tôi sử dụng.
- Tạo một Game Object mới (Game Object -> Create Empty) và đặt tên cho nó "Player"
- Tạo một Capsule mới (Đối tượng trò chơi -> Đối tượng 3D -> Capsule) và di chuyển nó vào trong Đối tượng "Player"
- Loại bỏ thành phần Capsule Collider khỏi Capsule và thay đổi vị trí của nó thành (0, 1, 0)
- Di chuyển Camera chính bên trong Đối tượng "Player" và thay đổi vị trí của nó thành (0, 1.64, 0)
- Tạo một tập lệnh mới, đặt tên là "SC_CharacterController" và dán mã bên dưới vào trong tập lệnh đó:
SC_CharacterController.cs
using UnityEngine;

[RequireComponent(typeof(CharacterController))]

public class SC_CharacterController : MonoBehaviour
{
    public float speed = 7.5f;
    public float jumpSpeed = 8.0f;
    public float gravity = 20.0f;
    public Camera playerCamera;
    public float lookSpeed = 2.0f;
    public float lookXLimit = 45.0f;

    CharacterController characterController;
    Vector3 moveDirection = Vector3.zero;
    Vector2 rotation = Vector2.zero;

    [HideInInspector]
    public bool canMove = true;

    void Start()
    {
        characterController = GetComponent<CharacterController>();
        rotation.y = transform.eulerAngles.y;
    }

    void Update()
    {
        if (characterController.isGrounded)
        {
            // We are grounded, so recalculate move direction based on axes
            Vector3 forward = transform.TransformDirection(Vector3.forward);
            Vector3 right = transform.TransformDirection(Vector3.right);
            float curSpeedX = canMove ? speed * Input.GetAxis("Vertical") : 0;
            float curSpeedY = canMove ? speed * Input.GetAxis("Horizontal") : 0;
            moveDirection = (forward * curSpeedX) + (right * curSpeedY);

            if (Input.GetButton("Jump") && canMove)
            {
                moveDirection.y = jumpSpeed;
            }
        }

        // Apply gravity. Gravity is multiplied by deltaTime twice (once here, and once below
        // when the moveDirection is multiplied by deltaTime). This is because gravity should be applied
        // as an acceleration (ms^-2)
        moveDirection.y -= gravity * Time.deltaTime;

        // Move the controller
        characterController.Move(moveDirection * Time.deltaTime);

        // Player and Camera rotation
        if (canMove)
        {
            rotation.y += Input.GetAxis("Mouse X") * lookSpeed;
            rotation.x += -Input.GetAxis("Mouse Y") * lookSpeed;
            rotation.x = Mathf.Clamp(rotation.x, -lookXLimit, lookXLimit);
            playerCamera.transform.localRotation = Quaternion.Euler(rotation.x, 0, 0);
            transform.eulerAngles = new Vector2(0, rotation.y);
        }
    }
}- Đính kèm tập lệnh SC_CharacterController vào đối tượng "Player" (Bạn sẽ nhận thấy rằng nó cũng đã thêm một thành phần khác gọi là Bộ điều khiển ký tự, thay đổi giá trị trung tâm của nó thành (0, 1, 0))
- Gán Camera chính cho biến Player Camera trong SC_CharacterController
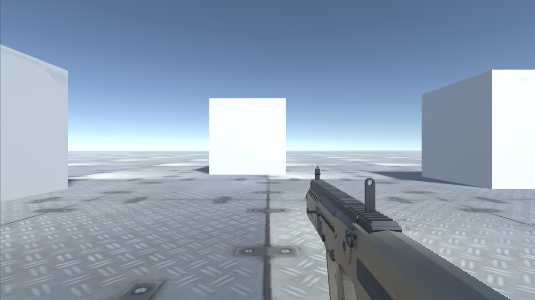
Bộ điều khiển Player hiện đã sẵn sàng:

Bước 2: Tạo hệ thống vũ khí
Hệ thống vũ khí của người chơi sẽ bao gồm 3 thành phần: Trình quản lý vũ khí, kịch bản Vũ khí và kịch bản Bullet.
- Tạo một tập lệnh mới, đặt tên là "SC_WeaponManager" và dán đoạn mã bên dưới vào bên trong nó:
SC_WeaponManager.cs
using UnityEngine;

public class SC_WeaponManager : MonoBehaviour
{
    public Camera playerCamera;
    public SC_Weapon primaryWeapon;
    public SC_Weapon secondaryWeapon;

    [HideInInspector]
    public SC_Weapon selectedWeapon;

    // Start is called before the first frame update
    void Start()
    {
        //At the start we enable the primary weapon and disable the secondary
        primaryWeapon.ActivateWeapon(true);
        secondaryWeapon.ActivateWeapon(false);
        selectedWeapon = primaryWeapon;
        primaryWeapon.manager = this;
        secondaryWeapon.manager = this;
    }

    // Update is called once per frame
    void Update()
    {
        //Select secondary weapon when pressing 1
        if (Input.GetKeyDown(KeyCode.Alpha1))
        {
            primaryWeapon.ActivateWeapon(false);
            secondaryWeapon.ActivateWeapon(true);
            selectedWeapon = secondaryWeapon;
        }

        //Select primary weapon when pressing 2
        if (Input.GetKeyDown(KeyCode.Alpha2))
        {
            primaryWeapon.ActivateWeapon(true);
            secondaryWeapon.ActivateWeapon(false);
            selectedWeapon = primaryWeapon;
        }
    }
}- Tạo một tập lệnh mới, đặt tên là "SC_Weapon" và dán đoạn mã bên dưới vào trong tập lệnh đó:
SC_Weapon.cs
using System.Collections;
using UnityEngine;

[RequireComponent(typeof(AudioSource))]

public class SC_Weapon : MonoBehaviour
{
    public bool singleFire = false;
    public float fireRate = 0.1f;
    public GameObject bulletPrefab;
    public Transform firePoint;
    public int bulletsPerMagazine = 30;
    public float timeToReload = 1.5f;
    public float weaponDamage = 15; //How much damage should this weapon deal
    public AudioClip fireAudio;
    public AudioClip reloadAudio;

    [HideInInspector]
    public SC_WeaponManager manager;

    float nextFireTime = 0;
    bool canFire = true;
    int bulletsPerMagazineDefault = 0;
    AudioSource audioSource;

    // Start is called before the first frame update
    void Start()
    {
        bulletsPerMagazineDefault = bulletsPerMagazine;
        audioSource = GetComponent<AudioSource>();
        audioSource.playOnAwake = false;
        //Make sound 3D
        audioSource.spatialBlend = 1f;
    }

    // Update is called once per frame
    void Update()
    {
        if (Input.GetMouseButtonDown(0) && singleFire)
        {
            Fire();
        }
        if (Input.GetMouseButton(0) && !singleFire)
        {
            Fire();
        }
        if (Input.GetKeyDown(KeyCode.R) && canFire)
        {
            StartCoroutine(Reload());
        }
    }

    void Fire()
    {
        if (canFire)
        {
            if (Time.time > nextFireTime)
            {
                nextFireTime = Time.time + fireRate;

                if (bulletsPerMagazine > 0)
                {
                    //Point fire point at the current center of Camera
                    Vector3 firePointPointerPosition = manager.playerCamera.transform.position + manager.playerCamera.transform.forward * 100;
                    RaycastHit hit;
                    if (Physics.Raycast(manager.playerCamera.transform.position, manager.playerCamera.transform.forward, out hit, 100))
                    {
                        firePointPointerPosition = hit.point;
                    }
                    firePoint.LookAt(firePointPointerPosition);
                    //Fire
                    GameObject bulletObject = Instantiate(bulletPrefab, firePoint.position, firePoint.rotation);
                    SC_Bullet bullet = bulletObject.GetComponent<SC_Bullet>();
                    //Set bullet damage according to weapon damage value
                    bullet.SetDamage(weaponDamage);

                    bulletsPerMagazine--;
                    audioSource.clip = fireAudio;
                    audioSource.Play();
                }
                else
                {
                    StartCoroutine(Reload());
                }
            }
        }
    }

    IEnumerator Reload()
    {
        canFire = false;

        audioSource.clip = reloadAudio;
        audioSource.Play();

        yield return new WaitForSeconds(timeToReload);

        bulletsPerMagazine = bulletsPerMagazineDefault;

        canFire = true;
    }

    //Called from SC_WeaponManager
    public void ActivateWeapon(bool activate)
    {
        StopAllCoroutines();
        canFire = true;
        gameObject.SetActive(activate);
    }
}- Tạo một tập lệnh mới, đặt tên là "SC_Bullet" và dán đoạn mã bên dưới vào trong tập lệnh đó:
SC_Bullet.cs
using System.Collections;
using UnityEngine;

public class SC_Bullet : MonoBehaviour
{
    public float bulletSpeed = 345;
    public float hitForce = 50f;
    public float destroyAfter = 3.5f;

    float currentTime = 0;
    Vector3 newPos;
    Vector3 oldPos;
    bool hasHit = false;

    float damagePoints;

    // Start is called before the first frame update
    IEnumerator Start()
    {
        newPos = transform.position;
        oldPos = newPos;

        while (currentTime < destroyAfter && !hasHit)
        {
            Vector3 velocity = transform.forward * bulletSpeed;
            newPos += velocity * Time.deltaTime;
            Vector3 direction = newPos - oldPos;
            float distance = direction.magnitude;
            RaycastHit hit;

            // Check if we hit anything on the way
            if (Physics.Raycast(oldPos, direction, out hit, distance))
            {
                if (hit.rigidbody != null)
                {
                    hit.rigidbody.AddForce(direction * hitForce);

                    IEntity npc = hit.transform.GetComponent<IEntity>();
                    if (npc != null)
                    {
                        //Apply damage to NPC
                        npc.ApplyDamage(damagePoints);
                    }
                }

                newPos = hit.point; //Adjust new position
                StartCoroutine(DestroyBullet());
            }

            currentTime += Time.deltaTime;
            yield return new WaitForFixedUpdate();

            transform.position = newPos;
            oldPos = newPos;
        }

        if (!hasHit)
        {
            StartCoroutine(DestroyBullet());
        }
    }

    IEnumerator DestroyBullet()
    {
        hasHit = true;
        yield return new WaitForSeconds(0.5f);
        Destroy(gameObject);
    }

    //Set how much damage this bullet will deal
    public void SetDamage(float points)
    {
        damagePoints = points;
    }
}
Bây giờ bạn sẽ nhận thấy tập lệnh SC_Bullet có một số lỗi. Đó là bởi vì chúng ta còn một việc cuối cùng phải làm, đó là xác định giao diện IEntity.
Các giao diện trong C# rất hữu ích khi bạn cần đảm bảo rằng tập lệnh sử dụng nó đã được triển khai một số phương thức nhất định.
Giao diện IEntity sẽ có một phương thức đó là ApplyDamage, phương thức này sau này sẽ được sử dụng để gây sát thương cho kẻ thù và người chơi của chúng ta.
- Tạo một tập lệnh mới, đặt tên là "SC_InterfaceManager" và dán đoạn mã bên dưới vào trong tập lệnh đó:
SC_InterfaceManager.cs
//Entity interafce
interface IEntity
{
    void ApplyDamage(float points);
}
Thiết lập Trình quản lý vũ khí
Người quản lý vũ khí là một Đối tượng sẽ nằm trong Đối tượng Camera Chính và sẽ chứa tất cả các loại vũ khí.
- Tạo một GameObject mới và đặt tên cho nó "WeaponManager"
- Di chuyển Trình quản lý vũ khí bên trong Camera chính của người chơi và thay đổi vị trí của nó thành (0, 0, 0)
- Đính kèm tập lệnh SC_WeaponManager vào "WeaponManager"
- Gán Camera chính cho biến Player Camera trong SC_WeaponManager
Thiết lập súng trường
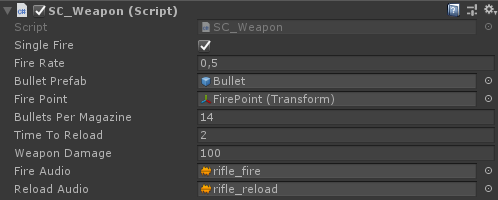
- Kéo và thả mô hình súng của bạn vào cảnh (hoặc đơn giản là tạo Khối lập phương và kéo dài nó nếu bạn chưa có mô hình).
- Chia tỷ lệ mô hình sao cho kích thước của nó tương ứng với Player Capsule
Trong trường hợp của tôi, tôi sẽ sử dụng mẫu Súng trường tùy chỉnh (BERGARA BA13):
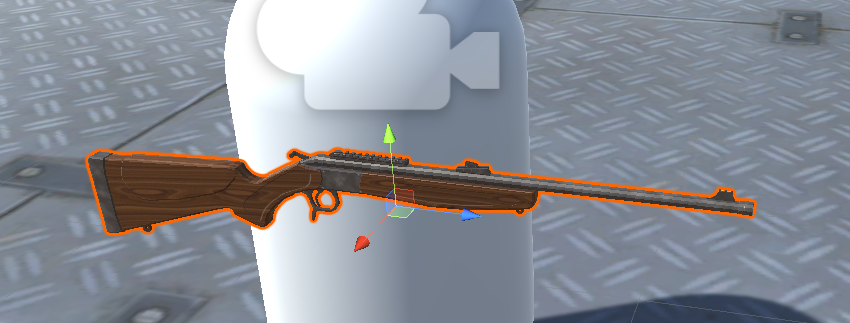
- Tạo một GameObject mới và đặt tên là "Rifle" sau đó di chuyển mô hình súng trường vào bên trong nó
- Di chuyển đối tượng "Rifle" bên trong đối tượng "WeaponManager" và đặt nó trước Camera như thế này:
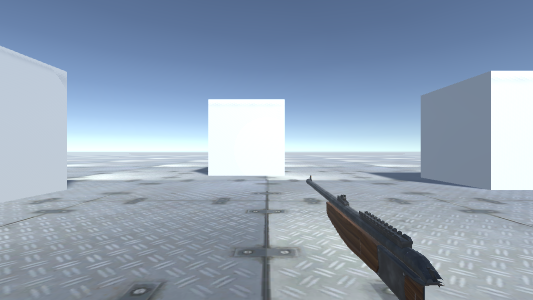
Để khắc phục việc cắt đối tượng, chỉ cần thay đổi mặt phẳng cắt gần của Máy ảnh thành một cái gì đó nhỏ hơn (trong trường hợp của tôi, tôi đặt nó thành 0,15):
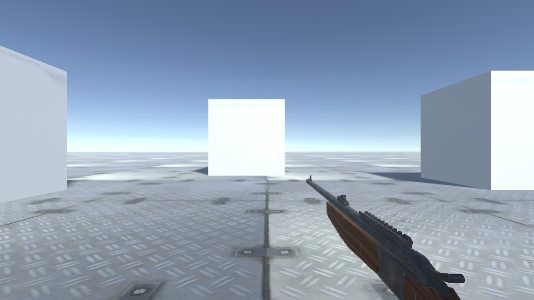
Tốt hơn nhiều.
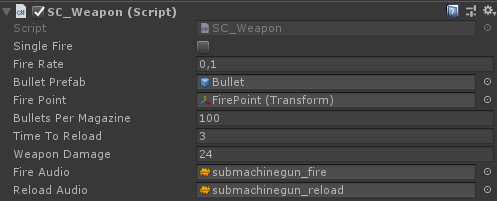
- Đính kèm tập lệnh SC_Weapon vào Đối tượng súng trường (Bạn sẽ nhận thấy rằng nó cũng đã thêm thành phần Nguồn âm thanh, điều này cần thiết để phát lửa và tải lại âm thanh).
Như bạn có thể thấy, SC_Weapon có 4 biến để gán. Bạn có thể gán ngay các biến âm thanh Fire audio và Reload nếu bạn có Clip âm thanh phù hợp trong dự án của mình.
Biến Bullet Prefab sẽ được giải thích sau trong hướng dẫn này.
Hiện tại, chúng ta sẽ chỉ gán biến Fire point:
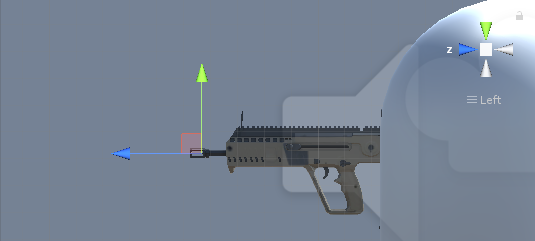
- Tạo một GameObject mới, đổi tên nó thành "FirePoint" và di chuyển nó vào trong Rifle Object. Đặt nó ngay trước thùng hoặc hơi vào trong, như thế này:
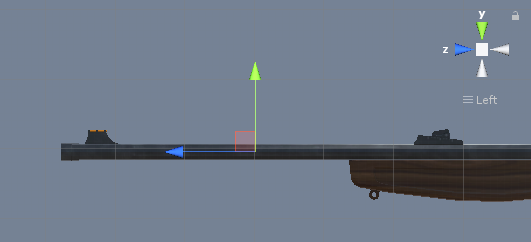
- Gán FirePoint Transform cho biến điểm Fire tại SC_Weapon
- Gán Súng trường cho biến Vũ khí phụ trong tập lệnh SC_WeaponManager
Thiết lập súng tiểu liên
- Nhân đôi đối tượng súng trường và đổi tên thành Submachinegun
- Thay thế mẫu súng bên trong nó bằng một mẫu khác (Trong trường hợp của tôi, tôi sẽ sử dụng mẫu TAVOR X95 được sản xuất riêng)
- Di chuyển biến đổi Fire Point cho đến khi nó phù hợp với mô hình mới
- Gán Submachinegun cho biến Vũ khí chính trong tập lệnh SC_WeaponManager

Thiết lập một Prefab Bullet
Nhà lắp ghép đạn sẽ được sinh ra theo tốc độ bắn của Vũ khí và sẽ sử dụng Raycast để phát hiện xem nó có bắn trúng thứ gì đó và gây sát thương hay không.
- Tạo một GameObject mới và đặt tên cho nó "Bullet"
- Thêm thành phần Trail Renderer vào nó và thay đổi biến Thời gian của nó thành 0,1.
- Đặt đường cong Chiều rộng thành giá trị thấp hơn (ví dụ: Bắt đầu 0,1 kết thúc 0), để thêm một vệt trông nhọn
- Tạo Vật liệu mới và đặt tên là Bullet_trail_material và thay đổi Shader của nó thành Particles/Additive
- Chỉ định vật liệu mới được tạo cho Trình kết xuất đường mòn
- Thay đổi Màu của Trail Renderer thành màu khác (ví dụ: Bắt đầu: Màu cam sáng Kết thúc: Màu cam đậm hơn)

- Lưu Đối tượng Bullet vào Prefab và xóa nó khỏi Cảnh.
- Gán một Prefab mới được tạo (kéo và thả từ chế độ xem Dự án) cho biến Prefab Bullet của Rifle và Submachinegun
Súng tiểu liên:
Súng trường:
Bây giờ vũ khí đã sẵn sàng.
Bước 3: Tạo AI của kẻ thù
Kẻ thù sẽ là những Khối đơn giản đi theo Người chơi và tấn công khi chúng đủ gần. Họ sẽ tấn công theo từng đợt, mỗi đợt sẽ có nhiều kẻ thù hơn để loại bỏ.
Thiết lập AI của kẻ thù
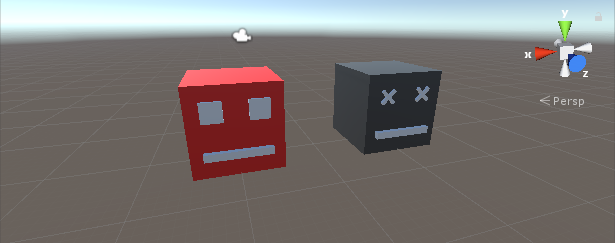
Dưới đây tôi đã tạo ra 2 biến thể của Khối lập phương (Bên trái dành cho cá thể còn sống và bên phải sẽ xuất hiện sau khi kẻ địch bị tiêu diệt):
- Thêm thành phần Rigidbody vào cả phiên bản chết và phiên bản còn sống
- Lưu Phiên bản chết vào Prefab và xóa nó khỏi Scene.
Bây giờ, phiên bản còn sống sẽ cần thêm một vài thành phần để có thể điều hướng cấp độ trò chơi và gây sát thương cho Người chơi.
- Tạo một tập lệnh mới và đặt tên là "SC_NPCEnemy" rồi dán đoạn mã bên dưới vào trong tập lệnh đó:
SC_NPCEnemy.cs
using UnityEngine;
using UnityEngine.AI;

[RequireComponent(typeof(NavMeshAgent))]

public class SC_NPCEnemy : MonoBehaviour, IEntity
{
    public float attackDistance = 3f;
    public float movementSpeed = 4f;
    public float npcHP = 100;
    //How much damage will npc deal to the player
    public float npcDamage = 5;
    public float attackRate = 0.5f;
    public Transform firePoint;
    public GameObject npcDeadPrefab;

    [HideInInspector]
    public Transform playerTransform;
    [HideInInspector]
    public SC_EnemySpawner es;
    NavMeshAgent agent;
    float nextAttackTime = 0;

    // Start is called before the first frame update
    void Start()
    {
        agent = GetComponent<NavMeshAgent>();
        agent.stoppingDistance = attackDistance;
        agent.speed = movementSpeed;

        //Set Rigidbody to Kinematic to prevent hit register bug
        if (GetComponent<Rigidbody>())
        {
            GetComponent<Rigidbody>().isKinematic = true;
        }
    }

    // Update is called once per frame
    void Update()
    {
        if (agent.remainingDistance - attackDistance < 0.01f)
        {
            if(Time.time > nextAttackTime)
            {
                nextAttackTime = Time.time + attackRate;

                //Attack
                RaycastHit hit;
                if(Physics.Raycast(firePoint.position, firePoint.forward, out hit, attackDistance))
                {
                    if (hit.transform.CompareTag("Player"))
                    {
                        Debug.DrawLine(firePoint.position, firePoint.position + firePoint.forward * attackDistance, Color.cyan);

                        IEntity player = hit.transform.GetComponent<IEntity>();
                        player.ApplyDamage(npcDamage);
                    }
                }
            }
        }
        //Move towardst he player
        agent.destination = playerTransform.position;
        //Always look at player
        transform.LookAt(new Vector3(playerTransform.transform.position.x, transform.position.y, playerTransform.position.z));
    }

    public void ApplyDamage(float points)
    {
        npcHP -= points;
        if(npcHP <= 0)
        {
            //Destroy the NPC
            GameObject npcDead = Instantiate(npcDeadPrefab, transform.position, transform.rotation);
            //Slightly bounce the npc dead prefab up
            npcDead.GetComponent<Rigidbody>().velocity = (-(playerTransform.position - transform.position).normalized * 8) + new Vector3(0, 5, 0);
            Destroy(npcDead, 10);
            es.EnemyEliminated(this);
            Destroy(gameObject);
        }
    }
}- Tạo một tập lệnh mới, đặt tên là "SC_EnemySpawner" rồi dán đoạn mã bên dưới vào trong tập lệnh đó:
SC_EnemySpawner.cs
using UnityEngine;
using UnityEngine.SceneManagement;

public class SC_EnemySpawner : MonoBehaviour
{
    public GameObject enemyPrefab;
    public SC_DamageReceiver player;
    public Texture crosshairTexture;
    public float spawnInterval = 2; //Spawn new enemy each n seconds
    public int enemiesPerWave = 5; //How many enemies per wave
    public Transform[] spawnPoints;

    float nextSpawnTime = 0;
    int waveNumber = 1;
    bool waitingForWave = true;
    float newWaveTimer = 0;
    int enemiesToEliminate;
    //How many enemies we already eliminated in the current wave
    int enemiesEliminated = 0;
    int totalEnemiesSpawned = 0;

    // Start is called before the first frame update
    void Start()
    {
        //Lock cursor
        Cursor.lockState = CursorLockMode.Locked;
        Cursor.visible = false;

        //Wait 10 seconds for new wave to start
        newWaveTimer = 10;
        waitingForWave = true;
    }

    // Update is called once per frame
    void Update()
    {
        if (waitingForWave)
        {
            if(newWaveTimer >= 0)
            {
                newWaveTimer -= Time.deltaTime;
            }
            else
            {
                //Initialize new wave
                enemiesToEliminate = waveNumber * enemiesPerWave;
                enemiesEliminated = 0;
                totalEnemiesSpawned = 0;
                waitingForWave = false;
            }
        }
        else
        {
            if(Time.time > nextSpawnTime)
            {
                nextSpawnTime = Time.time + spawnInterval;

                //Spawn enemy
                if(totalEnemiesSpawned < enemiesToEliminate)
                {
                    Transform randomPoint = spawnPoints[Random.Range(0, spawnPoints.Length - 1)];

                    GameObject enemy = Instantiate(enemyPrefab, randomPoint.position, Quaternion.identity);
                    SC_NPCEnemy npc = enemy.GetComponent<SC_NPCEnemy>();
                    npc.playerTransform = player.transform;
                    npc.es = this;
                    totalEnemiesSpawned++;
                }
            }
        }

        if (player.playerHP <= 0)
        {
            if (Input.GetKeyDown(KeyCode.Space))
            {
                Scene scene = SceneManager.GetActiveScene();
                SceneManager.LoadScene(scene.name);
            }
        }
    }

    void OnGUI()
    {
        GUI.Box(new Rect(10, Screen.height - 35, 100, 25), ((int)player.playerHP).ToString() + " HP");
        GUI.Box(new Rect(Screen.width / 2 - 35, Screen.height - 35, 70, 25), player.weaponManager.selectedWeapon.bulletsPerMagazine.ToString());

        if(player.playerHP <= 0)
        {
            GUI.Box(new Rect(Screen.width / 2 - 85, Screen.height / 2 - 20, 170, 40), "Game Over\n(Press 'Space' to Restart)");
        }
        else
        {
            GUI.DrawTexture(new Rect(Screen.width / 2 - 3, Screen.height / 2 - 3, 6, 6), crosshairTexture);
        }

        GUI.Box(new Rect(Screen.width / 2 - 50, 10, 100, 25), (enemiesToEliminate - enemiesEliminated).ToString());

        if (waitingForWave)
        {
            GUI.Box(new Rect(Screen.width / 2 - 125, Screen.height / 4 - 12, 250, 25), "Waiting for Wave " + waveNumber.ToString() + " (" + ((int)newWaveTimer).ToString() + " seconds left...)");
        }
    }

    public void EnemyEliminated(SC_NPCEnemy enemy)
    {
        enemiesEliminated++;

        if(enemiesToEliminate - enemiesEliminated <= 0)
        {
            //Start next wave
            newWaveTimer = 10;
            waitingForWave = true;
            waveNumber++;
        }
    }
}- Tạo một tập lệnh mới, đặt tên là "SC_DamageReceiver" rồi dán đoạn mã bên dưới vào trong tập lệnh đó:
SC_DamageReceiver.cs
using UnityEngine;
public class SC_DamageReceiver : MonoBehaviour, IEntity
{
//This script will keep track of player HP
public float playerHP = 100;
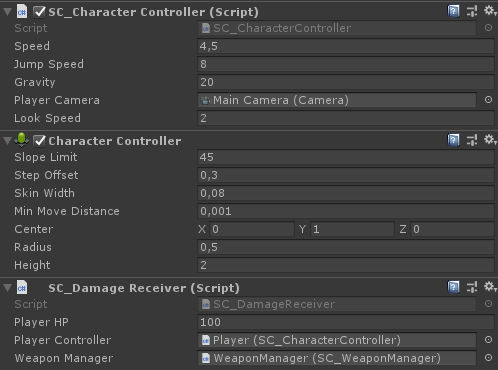
public SC_CharacterController playerController;
public SC_WeaponManager weaponManager;
public void ApplyDamage(float points)
{
playerHP -= points;
if(playerHP <= 0)
{
//Player is dead
playerController.canMove = false;
playerHP = 0;
}
}
}- Đính kèm tập lệnh SC_NPCNemy vào phiên bản kẻ thù còn sống (Bạn sẽ nhận thấy nó đã thêm một thành phần khác gọi là NavMesh Agent, thành phần này cần thiết để điều hướng NavMesh)
- Gán prefab phiên bản đã chết được tạo gần đây cho biến Npc Dead Prefab
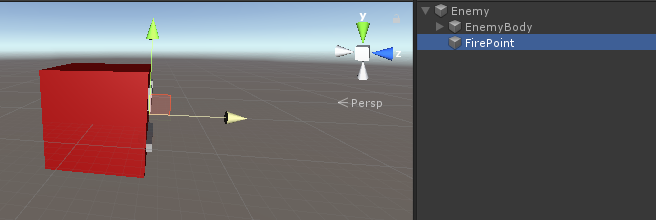
- Đối với Fire Point, hãy tạo một GameObject mới, di chuyển nó vào bên trong đối tượng còn sống và đặt nó ở phía trước đối tượng một chút, sau đó gán nó cho biến Fire Point:
- Cuối cùng, Lưu phiên bản còn sống vào Prefab và xóa nó khỏi Scene.
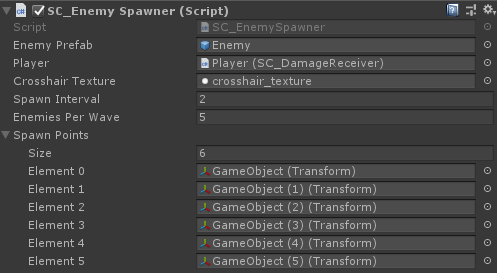
Thiết lập kẻ sinh sản của kẻ thù
Bây giờ hãy chuyển sang SC_EnemySpawner. Tập lệnh này sẽ sinh ra kẻ thù theo từng đợt và cũng sẽ hiển thị một số thông tin giao diện người dùng trên màn hình, chẳng hạn như HP của người chơi, đạn hiện tại, số lượng Kẻ thù còn lại trong một đợt hiện tại, v.v.
- Tạo một GameObject mới và đặt tên cho nó "_EnemySpawner"
- Đính kèm tập lệnh SC_EnemySpawner vào nó
- Gán AI của kẻ thù mới được tạo cho biến Prefab của kẻ thù
- Gán kết cấu bên dưới cho biến Kết cấu Crosshair
- Tạo một vài GameObject mới và đặt chúng xung quanh Cảnh, sau đó gán chúng vào mảng Điểm sinh sản
Bạn sẽ nhận thấy rằng còn một biến cuối cùng cần gán đó là biến Player.
- Đính kèm tập lệnh SC_DamageReceiver vào phiên bản Trình phát
- Thay đổi thẻ phiên bản Trình phát thành "Player"
- Gán các biến Trình điều khiển người chơi và Trình quản lý vũ khí trong SC_DamageReceiver
- Gán phiên bản Player cho biến Player trong SC_EnemySpawner
Và cuối cùng, chúng ta phải thiết lập NavMesh trong cảnh của mình để AI của kẻ thù có thể điều hướng.
Ngoài ra, đừng quên đánh dấu mọi Đối tượng tĩnh trong Cảnh là Điều hướng Tĩnh trước khi nướng NavMesh:
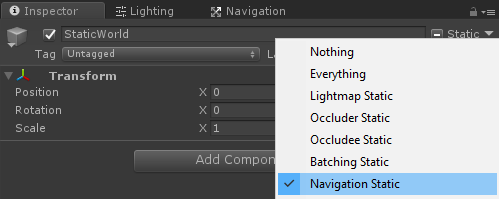
- Đi tới cửa sổ NavMesh (Cửa sổ -> AI -> Điều hướng), nhấp vào tab Bake sau đó nhấp vào nút Bake. Sau khi NavMesh được nướng, nó sẽ trông giống như thế này:

Bây giờ là lúc nhấn Play và kiểm tra nó:
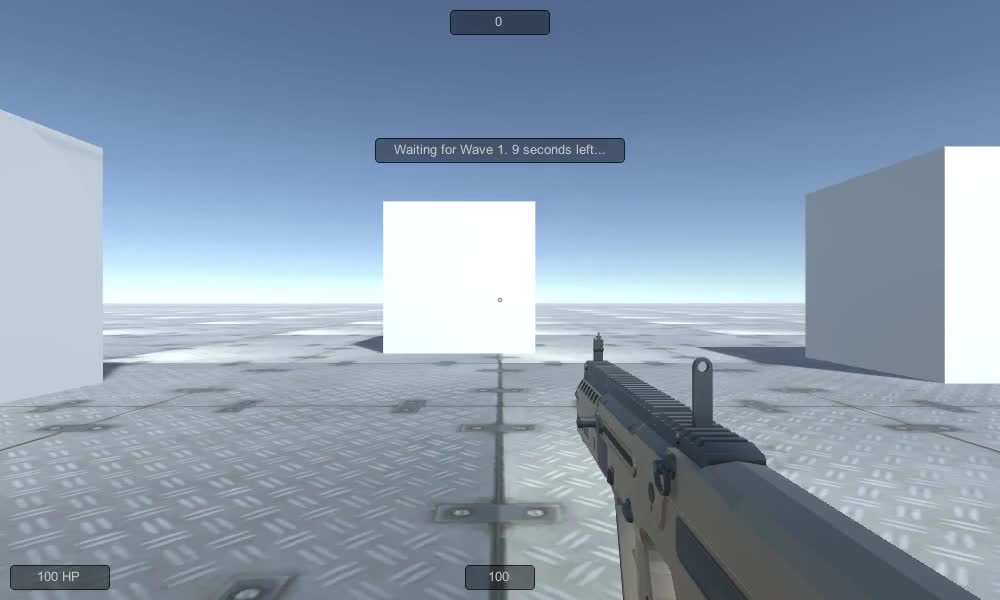
Mọi thứ hoạt động như mong đợi!