Tạo vật lý lốc xoáy trong sự thống nhất
Trong hướng dẫn này, chúng ta sẽ tạo một mô phỏng Tornado bên trong Unity.
Unity phiên bản được sử dụng trong hướng dẫn này: Unity 2018.3.0f2 (64-bit)
Bước 1: Tạo tất cả các tập lệnh cần thiết
Hướng dẫn này yêu cầu 2 tập lệnh:
SC_Caught.cs
//This script is attached automatically to each Object caught in Tornado

using UnityEngine;

public class SC_Caught : MonoBehaviour
{
    private SC_Tornado tornadoReference;
    private SpringJoint spring;
    [HideInInspector]
    public Rigidbody rigid;

    // Use this for initialization
    void Start()
    {
        rigid = GetComponent<Rigidbody>();
    }

    // Update is called once per frame
    void Update()
    {
        //Lift spring so objects are pulled upwards
        Vector3 newPosition = spring.connectedAnchor;
        newPosition.y = transform.position.y;
        spring.connectedAnchor = newPosition;
    }

    void FixedUpdate()
    {
        //Rotate object around tornado center
        Vector3 direction = transform.position - tornadoReference.transform.position;
        //Project
        Vector3 projection = Vector3.ProjectOnPlane(direction, tornadoReference.GetRotationAxis());
        projection.Normalize();
        Vector3 normal = Quaternion.AngleAxis(130, tornadoReference.GetRotationAxis()) * projection;
        normal = Quaternion.AngleAxis(tornadoReference.lift, projection) * normal;
        rigid.AddForce(normal * tornadoReference.GetStrength(), ForceMode.Force);

        Debug.DrawRay(transform.position, normal * 10, Color.red);
    }

    //Call this when tornadoReference already exists
    public void Init(SC_Tornado tornadoRef, Rigidbody tornadoRigidbody, float springForce)
    {
        //Make sure this is enabled (for reentrance)
        enabled = true;

        //Save tornado reference
        tornadoReference = tornadoRef;

        //Initialize the spring
        spring = gameObject.AddComponent<SpringJoint>();
        spring.spring = springForce;
        spring.connectedBody = tornadoRigidbody;

        spring.autoConfigureConnectedAnchor = false;

        //Set initial position of the caught object relative to its position and the tornado
        Vector3 initialPosition = Vector3.zero;
        initialPosition.y = transform.position.y;
        spring.connectedAnchor = initialPosition;
    }

    public void Release()
    {
        enabled = false;
        Destroy(spring);
    }
}
SC_Tornado.cs
//Tornado script controls tornado physics

using System.Collections.Generic;
using UnityEngine;

public class SC_Tornado : MonoBehaviour
{
    [Tooltip("Distance after which the rotation physics starts")]
    public float maxDistance = 20;

    [Tooltip("The axis that the caught objects will rotate around")]
    public Vector3 rotationAxis = new Vector3(0, 1, 0);

    [Tooltip("Angle that is added to the object's velocity (higher lift -> quicker on top)")]
    [Range(0, 90)]
    public float lift = 45;

    [Tooltip("The force that will drive the caught objects around the tornado's center")]
    public float rotationStrength = 50;

    [Tooltip("Tornado pull force")]
    public float tornadoStrength = 2;

    Rigidbody r;

    List<SC_Caught> caughtObject = new List<SC_Caught>();

    // Start is called before the first frame update
    void Start()
    {
        //Normalize the rotation axis given by the user
        rotationAxis.Normalize();

        r = GetComponent<Rigidbody>();
        r.isKinematic = true;
    }

    void FixedUpdate()
    {
        //Apply force to caught objects
        for (int i = 0; i < caughtObject.Count; i++)
        {
            if(caughtObject[i] != null)
            {
                Vector3 pull = transform.position - caughtObject[i].transform.position;
                if (pull.magnitude > maxDistance)
                {
                    caughtObject[i].rigid.AddForce(pull.normalized * pull.magnitude, ForceMode.Force);
                    caughtObject[i].enabled = false;
                }
                else
                {
                    caughtObject[i].enabled = true;
                }
            }
        }
    }

    void OnTriggerEnter(Collider other)
    {
        if (!other.attachedRigidbody) return;
        if (other.attachedRigidbody.isKinematic) return;

        //Add caught object to the list
        SC_Caught caught = other.GetComponent<SC_Caught>();
        if (!caught)
        {
            caught = other.gameObject.AddComponent<SC_Caught>();
        }

        caught.Init(this, r, tornadoStrength);

        if (!caughtObject.Contains(caught))
        {
            caughtObject.Add(caught);
        }
    }

    void OnTriggerExit(Collider other)
    {
        //Release caught object
        SC_Caught caught = other.GetComponent<SC_Caught>();
        if (caught)
        {
            caught.Release();

            if (caughtObject.Contains(caught))
            {
                caughtObject.Remove(caught);
            }
        }
    }

    public float GetStrength()
    {
        return rotationStrength;
    }

    //The axis the caught objects rotate around
    public Vector3 GetRotationAxis()
    {
        return rotationAxis;
    }

    //Draw tornado radius circle in Editor
    void OnDrawGizmosSelected()
    {
        Vector3[] positions = new Vector3[30];
        Vector3 centrePos = transform.position;
        for (int pointNum = 0; pointNum < positions.Length; pointNum++)
        {
            // "i" now represents the progress around the circle from 0-1
            // we multiply by 1.0 to ensure we get a fraction as a result.
            float i = (float)(pointNum * 2) / positions.Length;

            // get the angle for this step (in radians, not degrees)
            float angle = i * Mathf.PI * 2;

            // the X & Y position for this angle are calculated using Sin & Cos
            float x = Mathf.Sin(angle) * maxDistance;
            float z = Mathf.Cos(angle) * maxDistance;

            Vector3 pos = new Vector3(x, 0, z) + centrePos;
            positions[pointNum] = pos;
        }

        Gizmos.color = Color.cyan;
        for (int i = 0; i < positions.Length; i++)
        {
            if (i == positions.Length - 1)
            {
                Gizmos.DrawLine(positions[0], positions[positions.Length - 1]);
            }
            else
            {
                Gizmos.DrawLine(positions[i], positions[i + 1]);
            }
        }
    }
}![]()
Bước 2: Tạo cơn lốc xoáy
1. Tạo hạt lốc xoáy:
- Tạo một GameObject mới (GameObject -> Create Empty) và đặt tên cho nó "Tornado"
- Tạo một GameObject khác và đặt tên là "Particles", di chuyển nó vào trong "Tornado" và thay đổi vị trí của nó thành (0, 0, 0)
- Thêm một thành phần ParticleSystem vào "Particles" GameObject
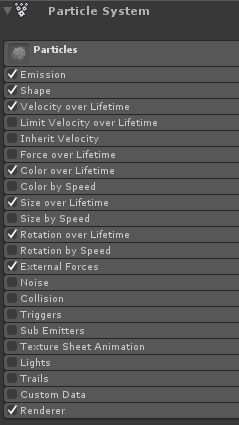
- Trong Hệ thống hạt, hãy bật các mô-đun này: Emission, Shape, Vận tốc trong suốt vòng đời, Màu sắc trong suốt vòng đời, Kích thước trong vòng đời , Xoay vòng trong suốt vòng đời, Lực lượng bên ngoài, Trình kết xuất.
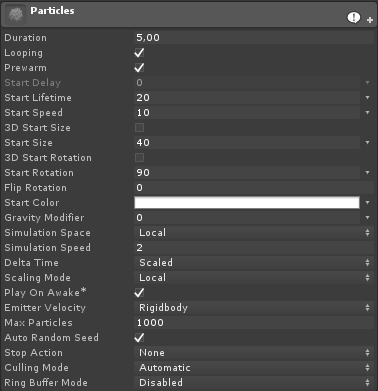
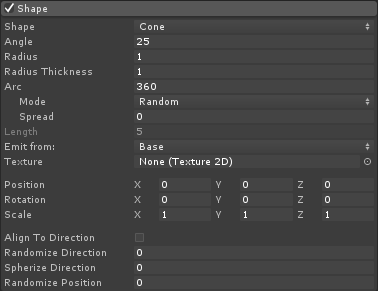
2. Gán các giá trị cho từng mô-đun Hệ thống hạt (Kiểm tra ảnh chụp màn hình bên dưới):
Mô-đun chính (Hạt):
Mô-đun phát thải:
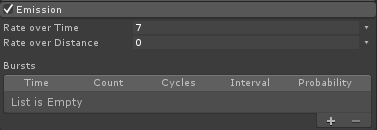
Mô-đun hình dạng:
Mô-đun vận tốc trên vòng đời:

Mô-đun màu trên trọn đời:
![]()
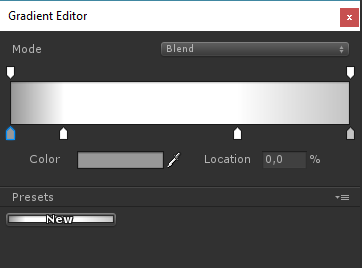
(2 màu xám ở mỗi đầu và 2 màu trắng ở phần bên trong)
Kích thước trên mô-đun trọn đời:

(Kích thước trên toàn bộ thời gian sử dụng đường cong trông như thế này):
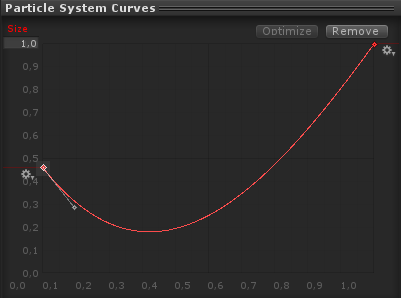
(Kích thước giảm nhẹ rồi tăng lên)
Xoay vòng suốt đời:
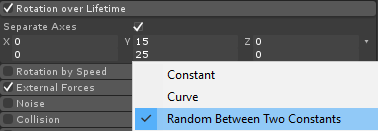
Mô-đun lực lượng bên ngoài:
Mô-đun này không cần bất kỳ thay đổi nào, chỉ để lại các giá trị mặc định.
Mô-đun kết xuất:
Đối với mô-đun này, chúng ta chỉ cần gán tài liệu sau:
- Tạo một vật liệu mới và gọi nó "tornado_material"
- Thay đổi Shader của nó thành "Legacy Shaders/Particles/Alpha Blended"
- Gán kết cấu bên dưới cho nó (hoặc bấm vào đây):
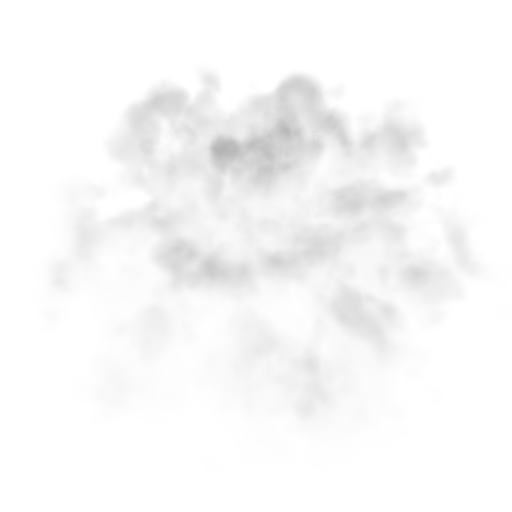
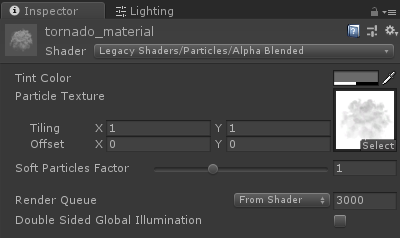
- Gán lốc xoáy_material cho mô-đun Trình kết xuất:

Bây giờ các hạt Tornado sẽ trông giống như thế này:
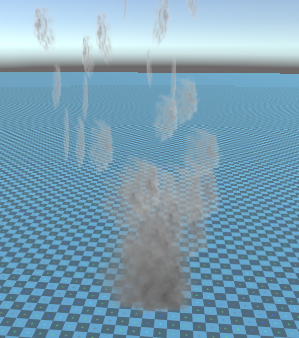
Nhưng như bạn có thể thấy, nó trông không giống Tornado chút nào, đó là vì chúng ta có thêm một thành phần nữa, đó là Particle System Force Field, thành phần này cần thiết để mô phỏng gió tròn:
- Tạo một GameObject mới và đặt tên cho nó "ForceField"
- Di chuyển "ForceField" bên trong "Tornado" GameObject và thay đổi vị trí của nó thành (0, 0, 0)

- Thêm thành phần Trường lực của hệ thống hạt vào "ForceField"
- Thay đổi các giá trị của thành phần Trường lực thành giống như trong ảnh chụp màn hình bên dưới:
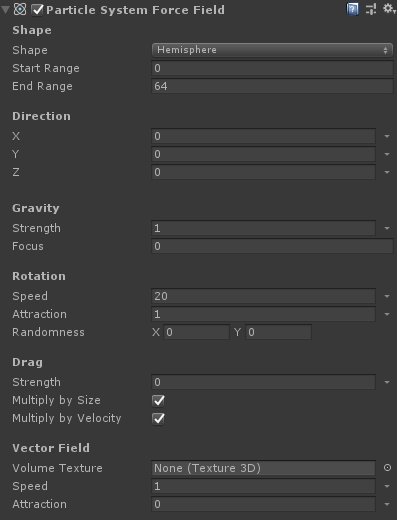
Bây giờ các hạt sẽ trông giống như thế này, tốt hơn nhiều:
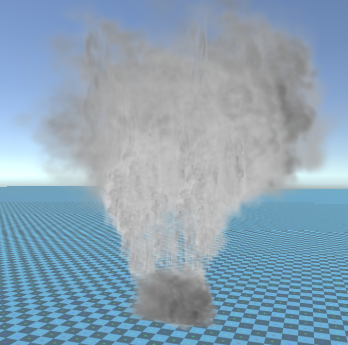
3. Thiết lập vật lý lốc xoáy
- Thêm các thành phần Rigidbody và SC_Tornado vào "Tornado" GameObject
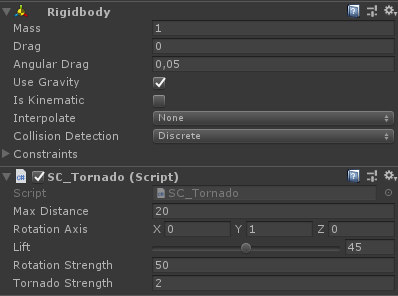
- Tạo một GameObject mới và đặt tên cho nó "Trigger"
- Di chuyển "Trigger" bên trong "Tornado" GameObject và thay đổi vị trí của nó thành (0, 10, 0) và thay đổi tỷ lệ của nó thành (60, 10, 60)
- Thêm thành phần MeshCollider vào "Trigger" GameObject, chọn các hộp kiểm Convex và IsTrigger và thay đổi Lưới của nó thành Hình trụ mặc định
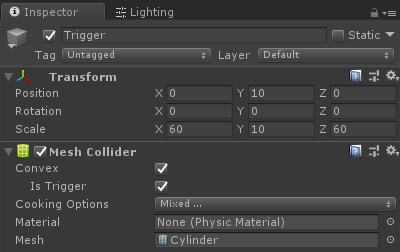
Cơn lốc xoáy đã sẵn sàng!
Để kiểm tra nó, bạn chỉ cần tạo một Khối lập phương và thêm thành phần Rigidbody, sau đó đặt nó vào trong khu vực Kích hoạt.
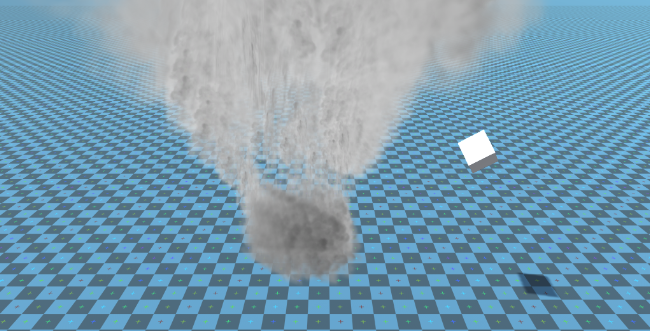
Khi bạn nhấn Play, khối lập phương sẽ bị Tornado kéo vào:
