Tạo trò chơi nhiều người chơi trong Unity bằng PUN 2
Bạn đã bao giờ tự hỏi cần những gì để tạo một trò chơi nhiều người chơi bên trong Unity chưa?
Không giống như các trò chơi một người chơi, trò chơi nhiều người chơi yêu cầu một máy chủ từ xa đóng vai trò là cầu nối, cho phép các máy khách trò chơi giao tiếp với nhau.
Ngày nay có nhiều dịch vụ chăm sóc máy chủ lưu trữ. Một trong những dịch vụ như vậy là Photon Network mà chúng tôi sẽ sử dụng cho hướng dẫn này.
PUN 2 là bản phát hành API mới nhất của họ đã được cải tiến rất nhiều so với phiên bản cũ.
Trong bài đăng này, chúng tôi sẽ thực hiện tải xuống các tệp cần thiết, thiết lập Photon AppID và lập trình một ví dụ nhiều người chơi đơn giản.
Unity phiên bản được sử dụng trong hướng dẫn này: Unity 2018.3.0f2 (64-bit)
Phần 1: Thiết lập PUN 2
Bước đầu tiên là tải xuống gói PUN 2 từ Asset Store. Nó chứa tất cả các tập lệnh và tệp cần thiết để tích hợp nhiều người chơi.
- Mở dự án Unity của bạn sau đó đi tới Asset Store: (Window -> General -> AssetStore) hoặc nhấn Ctrl+9
- Tìm kiếm "PUN 2- Free" rồi nhấp vào kết quả đầu tiên hoặc nhấp vào đây
- Nhập gói PUN 2 sau khi quá trình tải xuống hoàn tất
![]()

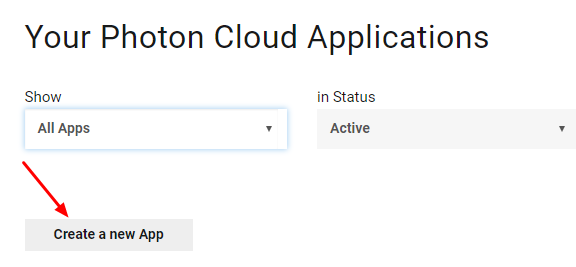
- Sau khi gói được nhập, bạn cần tạo ID ứng dụng Photon, việc này được thực hiện trên trang web của họ: https://www.photonengine.com/
- Tạo một tài khoản mới (hoặc đăng nhập vào tài khoản hiện tại của bạn)
- Đi tới trang Ứng dụng bằng cách nhấp vào biểu tượng hồ sơ rồi "Your Applications" hoặc theo liên kết sau: https://dashboard.photonengine.com/en-US/PublicCloud
- Trên trang Ứng dụng, nhấp vào "Create new app"
- Trên trang tạo, phần Photon Type chọn "Photon Realtime" và phần Name, nhập tên bất kỳ rồi nhấp vào "Create"
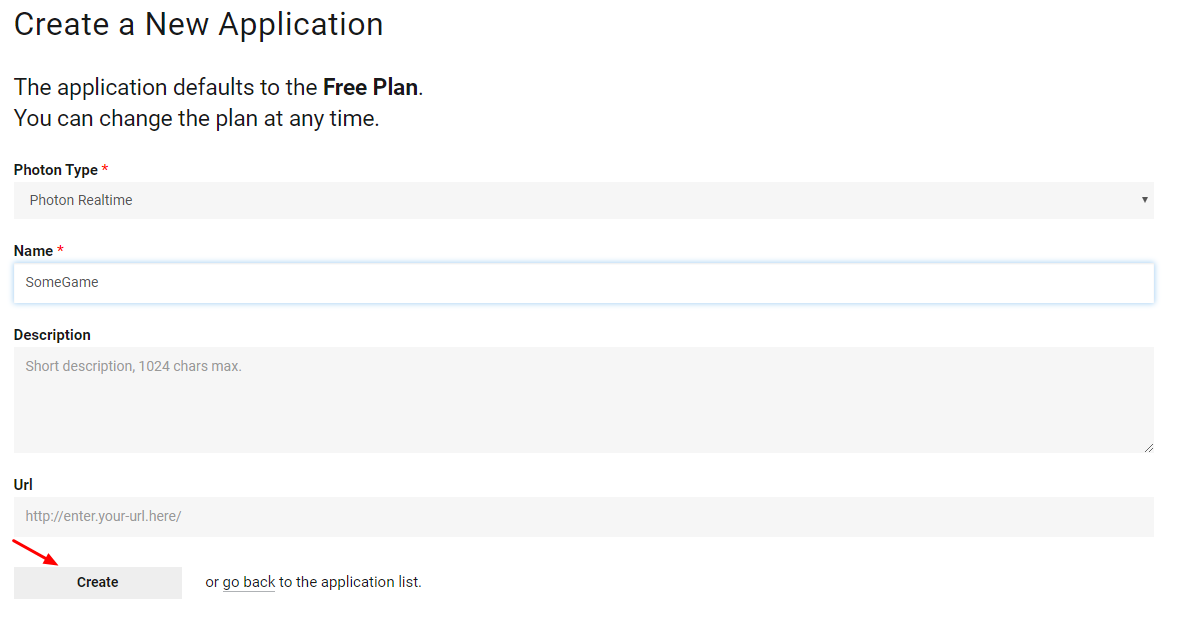
Như bạn có thể thấy, Ứng dụng mặc định ở gói Miễn phí. Bạn có thể đọc thêm về Gói giá tại đây
- Sau khi Ứng dụng được tạo, hãy sao chép ID ứng dụng nằm dưới Tên ứng dụng

- Quay lại dự án Unity của bạn sau đó vào Window -> Photon Unity Networking -> PUN Wizard
- Trong Trình hướng dẫn PUN, nhấp vào "Setup Project", dán ID ứng dụng của bạn rồi nhấp vào "Setup Project"
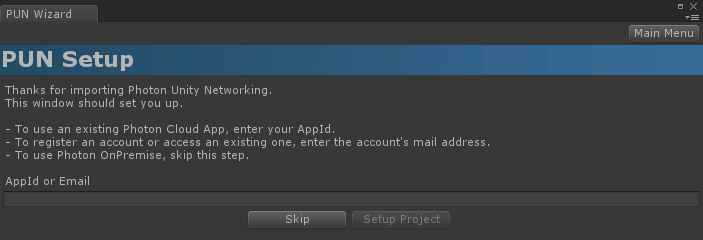
- PUN 2 hiện đã sẵn sàng!
Phần 2: Tạo trò chơi nhiều người chơi
Bây giờ hãy chuyển sang phần chúng ta thực sự tạo ra một trò chơi nhiều người chơi.
Cách xử lý nhiều người chơi trong PUN 2 là:
- Đầu tiên, chúng tôi kết nối với Vùng Photon (ví dụ: Đông Hoa Kỳ, Châu Âu, Châu Á, v.v.), còn được gọi là Sảnh.
- Khi ở trong Sảnh, chúng tôi yêu cầu tất cả các Phòng được tạo trong Khu vực và sau đó chúng tôi có thể tham gia một trong các Phòng hoặc tạo Phòng của riêng mình.
- Sau khi tham gia phòng, chúng tôi yêu cầu danh sách những người chơi được kết nối với Phòng và khởi tạo các phiên bản Người chơi của họ, sau đó được đồng bộ hóa với các phiên bản cục bộ của họ thông qua PhotonView.
- Khi ai đó rời khỏi Phòng, phiên bản của họ sẽ bị hủy và họ bị xóa khỏi Danh sách người chơi.
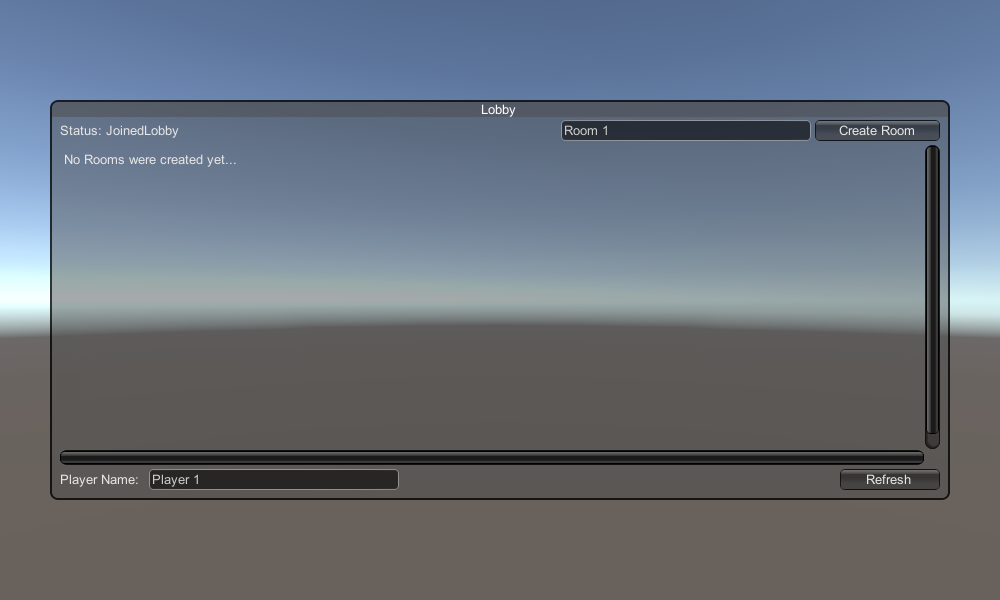
1. Thiết lập sảnh
Hãy bắt đầu bằng cách tạo cảnh Sảnh sẽ chứa logic Sảnh (Duyệt các phòng hiện có, tạo phòng mới, v.v.):
- Tạo một tập lệnh C# mới và gọi nó là PUN2_GameLobby
- Tạo một Cảnh mới và gọi nó "GameLobby"
- Trong cảnh GameLobby, hãy tạo một GameObject mới. Gọi nó là "_GameLobby" và gán tập lệnh PUN2_GameLobby cho nó
Bây giờ hãy mở tập lệnh PUN2_GameLobby:
Đầu tiên, chúng tôi nhập không gian tên Photon bằng cách thêm các dòng bên dưới vào đầu tập lệnh:
using Photon.Pun;
using Photon.Realtime;
Ngoài ra, trước khi tiếp tục, chúng ta cần thay thế MonoBehaviour mặc định bằng MonoBehaviourPunCallbacks. Bước này là cần thiết để có thể sử dụng lệnh gọi lại Photon:
public class PUN2_GameLobby : MonoBehaviourPunCallbacksTiếp theo, chúng ta tạo các biến cần thiết:
    //Our player name
    string playerName = "Player 1";
    //Users are separated from each other by gameversion (which allows you to make breaking changes).
    string gameVersion = "0.9";
    //The list of created rooms
    List<RoomInfo> createdRooms = new List<RoomInfo>();
    //Use this name when creating a Room
    string roomName = "Room 1";
    Vector2 roomListScroll = Vector2.zero;
    bool joiningRoom = false;
Sau đó, chúng tôi gọi ConnectUsingSettings() trong void Start(). Điều này có nghĩa là ngay khi trò chơi mở ra, nó sẽ kết nối với Máy chủ Photon:
    // Use this for initialization
    void Start()
    {
        //This makes sure we can use PhotonNetwork.LoadLevel() on the master client and all clients in the same room sync their level automatically
        PhotonNetwork.AutomaticallySyncScene = true;

        if (!PhotonNetwork.IsConnected)
        {
            //Set the App version before connecting
            PhotonNetwork.PhotonServerSettings.AppSettings.AppVersion = gameVersion;
            // Connect to the photon master-server. We use the settings saved in PhotonServerSettings (a .asset file in this project)
            PhotonNetwork.ConnectUsingSettings();
        }
    }
Để biết liệu kết nối với Photon có thành công hay không, chúng ta cần triển khai các lệnh gọi lại sau: OnDisconnected(DisconnectCause Cause), OnConnectedToMaster(), OnRoomListUpdate(List<RoomInfo> roomList)
    public override void OnDisconnected(DisconnectCause cause)
    {
        Debug.Log("OnFailedToConnectToPhoton. StatusCode: " + cause.ToString() + " ServerAddress: " + PhotonNetwork.ServerAddress);
    }

    public override void OnConnectedToMaster()
    {
        Debug.Log("OnConnectedToMaster");
        //After we connected to Master server, join the Lobby
        PhotonNetwork.JoinLobby(TypedLobby.Default);
    }

    public override void OnRoomListUpdate(List<RoomInfo> roomList)
    {
        Debug.Log("We have received the Room list");
        //After this callback, update the room list
        createdRooms = roomList;
    }
Tiếp theo là phần UI, nơi thực hiện duyệt Room và tạo Room:
    void OnGUI()
    {
        GUI.Window(0, new Rect(Screen.width / 2 - 450, Screen.height / 2 - 200, 900, 400), LobbyWindow, "Lobby");
    }

    void LobbyWindow(int index)
    {
        //Connection Status and Room creation Button
        GUILayout.BeginHorizontal();

        GUILayout.Label("Status: " + PhotonNetwork.NetworkClientState);

        if (joiningRoom || !PhotonNetwork.IsConnected || PhotonNetwork.NetworkClientState != ClientState.JoinedLobby)
        {
            GUI.enabled = false;
        }

        GUILayout.FlexibleSpace();

        //Room name text field
        roomName = GUILayout.TextField(roomName, GUILayout.Width(250));

        if (GUILayout.Button("Create Room", GUILayout.Width(125)))
        {
            if (roomName != "")
            {
                joiningRoom = true;

                RoomOptions roomOptions = new RoomOptions();
                roomOptions.IsOpen = true;
                roomOptions.IsVisible = true;
                roomOptions.MaxPlayers = (byte)10; //Set any number

                PhotonNetwork.JoinOrCreateRoom(roomName, roomOptions, TypedLobby.Default);
            }
        }

        GUILayout.EndHorizontal();

        //Scroll through available rooms
        roomListScroll = GUILayout.BeginScrollView(roomListScroll, true, true);

        if (createdRooms.Count == 0)
        {
            GUILayout.Label("No Rooms were created yet...");
        }
        else
        {
            for (int i = 0; i < createdRooms.Count; i++)
            {
                GUILayout.BeginHorizontal("box");
                GUILayout.Label(createdRooms[i].Name, GUILayout.Width(400));
                GUILayout.Label(createdRooms[i].PlayerCount + "/" + createdRooms[i].MaxPlayers);

                GUILayout.FlexibleSpace();

                if (GUILayout.Button("Join Room"))
                {
                    joiningRoom = true;

                    //Set our Player name
                    PhotonNetwork.NickName = playerName;

                    //Join the Room
                    PhotonNetwork.JoinRoom(createdRooms[i].Name);
                }
                GUILayout.EndHorizontal();
            }
        }

        GUILayout.EndScrollView();

        //Set player name and Refresh Room button
        GUILayout.BeginHorizontal();

        GUILayout.Label("Player Name: ", GUILayout.Width(85));
        //Player name text field
        playerName = GUILayout.TextField(playerName, GUILayout.Width(250));

        GUILayout.FlexibleSpace();

        GUI.enabled = (PhotonNetwork.NetworkClientState == ClientState.JoinedLobby || PhotonNetwork.NetworkClientState == ClientState.Disconnected) && !joiningRoom;
        if (GUILayout.Button("Refresh", GUILayout.Width(100)))
        {
            if (PhotonNetwork.IsConnected)
            {
                //Re-join Lobby to get the latest Room list
                PhotonNetwork.JoinLobby(TypedLobby.Default);
            }
            else
            {
                //We are not connected, estabilish a new connection
                PhotonNetwork.ConnectUsingSettings();
            }
        }

        GUILayout.EndHorizontal();

        if (joiningRoom)
        {
            GUI.enabled = true;
            GUI.Label(new Rect(900 / 2 - 50, 400 / 2 - 10, 100, 20), "Connecting...");
        }
    }
Và cuối cùng, chúng tôi triển khai 4 lệnh gọi lại khác: OnCreateRoomFailed(short returnCode, string message), OnJoinRoomFailed(short returnCode, string message), OnCreatedRoom() và OnJoinedRoom().
Những lệnh gọi lại này được sử dụng để xác định xem chúng tôi đã Tham gia/Tạo phòng hay có bất kỳ vấn đề nào trong quá trình kết nối.
Đây là tập lệnh PUN2_GameLobby.cs cuối cùng:
using System.Collections.Generic;
using UnityEngine;
using Photon.Pun;
using Photon.Realtime;

public class PUN2_GameLobby : MonoBehaviourPunCallbacks
{

    //Our player name
    string playerName = "Player 1";
    //Users are separated from each other by gameversion (which allows you to make breaking changes).
    string gameVersion = "0.9";
    //The list of created rooms
    List<RoomInfo> createdRooms = new List<RoomInfo>();
    //Use this name when creating a Room
    string roomName = "Room 1";
    Vector2 roomListScroll = Vector2.zero;
    bool joiningRoom = false;

    // Use this for initialization
    void Start()
    {
        //This makes sure we can use PhotonNetwork.LoadLevel() on the master client and all clients in the same room sync their level automatically
        PhotonNetwork.AutomaticallySyncScene = true;

        if (!PhotonNetwork.IsConnected)
        {
            //Set the App version before connecting
            PhotonNetwork.PhotonServerSettings.AppSettings.AppVersion = gameVersion;
            // Connect to the photon master-server. We use the settings saved in PhotonServerSettings (a .asset file in this project)
            PhotonNetwork.ConnectUsingSettings();
        }
    }

    public override void OnDisconnected(DisconnectCause cause)
    {
        Debug.Log("OnFailedToConnectToPhoton. StatusCode: " + cause.ToString() + " ServerAddress: " + PhotonNetwork.ServerAddress);
    }

    public override void OnConnectedToMaster()
    {
        Debug.Log("OnConnectedToMaster");
        //After we connected to Master server, join the Lobby
        PhotonNetwork.JoinLobby(TypedLobby.Default);
    }

    public override void OnRoomListUpdate(List<RoomInfo> roomList)
    {
        Debug.Log("We have received the Room list");
        //After this callback, update the room list
        createdRooms = roomList;
    }

    void OnGUI()
    {
        GUI.Window(0, new Rect(Screen.width / 2 - 450, Screen.height / 2 - 200, 900, 400), LobbyWindow, "Lobby");
    }

    void LobbyWindow(int index)
    {
        //Connection Status and Room creation Button
        GUILayout.BeginHorizontal();

        GUILayout.Label("Status: " + PhotonNetwork.NetworkClientState);

        if (joiningRoom || !PhotonNetwork.IsConnected || PhotonNetwork.NetworkClientState != ClientState.JoinedLobby)
        {
            GUI.enabled = false;
        }

        GUILayout.FlexibleSpace();

        //Room name text field
        roomName = GUILayout.TextField(roomName, GUILayout.Width(250));

        if (GUILayout.Button("Create Room", GUILayout.Width(125)))
        {
            if (roomName != "")
            {
                joiningRoom = true;

                RoomOptions roomOptions = new RoomOptions();
                roomOptions.IsOpen = true;
                roomOptions.IsVisible = true;
                roomOptions.MaxPlayers = (byte)10; //Set any number

                PhotonNetwork.JoinOrCreateRoom(roomName, roomOptions, TypedLobby.Default);
            }
        }

        GUILayout.EndHorizontal();

        //Scroll through available rooms
        roomListScroll = GUILayout.BeginScrollView(roomListScroll, true, true);

        if (createdRooms.Count == 0)
        {
            GUILayout.Label("No Rooms were created yet...");
        }
        else
        {
            for (int i = 0; i < createdRooms.Count; i++)
            {
                GUILayout.BeginHorizontal("box");
                GUILayout.Label(createdRooms[i].Name, GUILayout.Width(400));
                GUILayout.Label(createdRooms[i].PlayerCount + "/" + createdRooms[i].MaxPlayers);

                GUILayout.FlexibleSpace();

                if (GUILayout.Button("Join Room"))
                {
                    joiningRoom = true;

                    //Set our Player name
                    PhotonNetwork.NickName = playerName;

                    //Join the Room
                    PhotonNetwork.JoinRoom(createdRooms[i].Name);
                }
                GUILayout.EndHorizontal();
            }
        }

        GUILayout.EndScrollView();

        //Set player name and Refresh Room button
        GUILayout.BeginHorizontal();

        GUILayout.Label("Player Name: ", GUILayout.Width(85));
        //Player name text field
        playerName = GUILayout.TextField(playerName, GUILayout.Width(250));

        GUILayout.FlexibleSpace();

        GUI.enabled = (PhotonNetwork.NetworkClientState == ClientState.JoinedLobby || PhotonNetwork.NetworkClientState == ClientState.Disconnected) && !joiningRoom;
        if (GUILayout.Button("Refresh", GUILayout.Width(100)))
        {
            if (PhotonNetwork.IsConnected)
            {
                //Re-join Lobby to get the latest Room list
                PhotonNetwork.JoinLobby(TypedLobby.Default);
            }
            else
            {
                //We are not connected, estabilish a new connection
                PhotonNetwork.ConnectUsingSettings();
            }
        }

        GUILayout.EndHorizontal();

        if (joiningRoom)
        {
            GUI.enabled = true;
            GUI.Label(new Rect(900 / 2 - 50, 400 / 2 - 10, 100, 20), "Connecting...");
        }
    }

    public override void OnCreateRoomFailed(short returnCode, string message)
    {
        Debug.Log("OnCreateRoomFailed got called. This can happen if the room exists (even if not visible). Try another room name.");
        joiningRoom = false;
    }

    public override void OnJoinRoomFailed(short returnCode, string message)
    {
        Debug.Log("OnJoinRoomFailed got called. This can happen if the room is not existing or full or closed.");
        joiningRoom = false;
    }

    public override void OnJoinRandomFailed(short returnCode, string message)
    {
        Debug.Log("OnJoinRandomFailed got called. This can happen if the room is not existing or full or closed.");
        joiningRoom = false;
    }

    public override void OnCreatedRoom()
    {
        Debug.Log("OnCreatedRoom");
        //Set our player name
        PhotonNetwork.NickName = playerName;
        //Load the Scene called GameLevel (Make sure it's added to build settings)
        PhotonNetwork.LoadLevel("GameLevel");
    }

    public override void OnJoinedRoom()
    {
        Debug.Log("OnJoinedRoom");
    }
}
2. Tạo prefab Player
Trong game Multiplayer, instance Player có 2 mặt: Local và Remote
Một phiên bản cục bộ được kiểm soát cục bộ (bởi chúng tôi).
Mặt khác, một phiên bản từ xa là sự thể hiện cục bộ về những gì người chơi khác đang làm. Nó sẽ không bị ảnh hưởng bởi đầu vào của chúng tôi.
Để xác định xem phiên bản là Cục bộ hay Từ xa, chúng tôi sử dụng thành phần PhotonView.
PhotonView hoạt động như một trình nhắn tin nhận và gửi các giá trị cần được đồng bộ hóa, chẳng hạn như vị trí và góc quay.
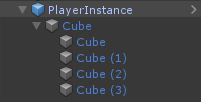
Vì vậy, hãy bắt đầu bằng cách tạo phiên bản trình phát (Nếu bạn đã có sẵn phiên bản trình phát, bạn có thể bỏ qua bước này).
Trong trường hợp của tôi, phiên bản Player sẽ là một Khối lập phương đơn giản được di chuyển bằng phím W và S và xoay bằng phím A và D.

Đây là một tập lệnh điều khiển đơn giản:
SimplePlayerController.cs
using UnityEngine;
public class SimplePlayerController : MonoBehaviour
{
// Update is called once per frame
void Update()
{
//Move Front/Back
if (Input.GetKey(KeyCode.W))
{
transform.Translate(transform.forward * Time.deltaTime * 2.45f, Space.World);
}
else if (Input.GetKey(KeyCode.S))
{
transform.Translate(-transform.forward * Time.deltaTime * 2.45f, Space.World);
}
//Rotate Left/Right
if (Input.GetKey(KeyCode.A))
{
transform.Rotate(new Vector3(0, -14, 0) * Time.deltaTime * 4.5f, Space.Self);
}
else if (Input.GetKey(KeyCode.D))
{
transform.Rotate(new Vector3(0, 14, 0) * Time.deltaTime * 4.5f, Space.Self);
}
}
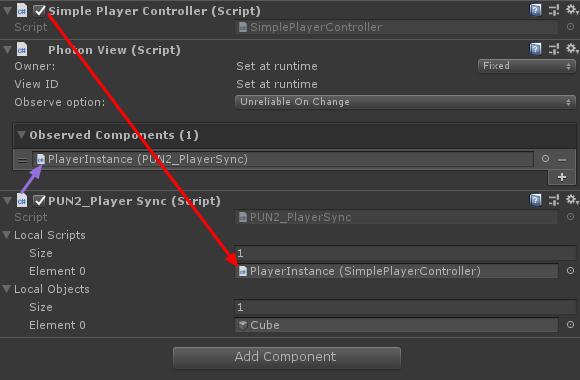
}Bước tiếp theo là thêm thành phần PhotonView.
- Thêm thành phần PhotonView vào Phiên bản trình phát.
- Tạo tập lệnh C# mới và gọi nó là PUN2_PlayerSync (tập lệnh này sẽ được sử dụng để giao tiếp qua PhotonView).
Mở tập lệnh PUN2_PlayerSync:
Trong PUN2_PlayerSync, điều đầu tiên chúng ta cần làm là thêm không gian tên Photon.Pun và thay thế MonoBehaviour bằng MonoBehaviourPun, đồng thời thêm giao diện IPunObservable.
MonoBehaviourPun là cần thiết để có thể sử dụng biến photonView được lưu trong bộ nhớ đệm, thay vì sử dụng GetComponent<PhotonView>().
using UnityEngine;
using Photon.Pun;

public class PUN2_PlayerSync : MonoBehaviourPun, IPunObservable
Sau đó, chúng ta có thể chuyển sang tạo tất cả các biến cần thiết:
    //List of the scripts that should only be active for the local player (ex. PlayerController, MouseLook etc.)
    public MonoBehaviour[] localScripts;
    //List of the GameObjects that should only be active for the local player (ex. Camera, AudioListener etc.)
    public GameObject[] localObjects;
    //Values that will be synced over network
    Vector3 latestPos;
    Quaternion latestRot;
Sau đó, trong void Start(), chúng tôi kiểm tra xem trình phát là Cục bộ hay Từ xa bằng cách sử dụng photonView.IsMine:
    // Use this for initialization
    void Start()
    {
        if (photonView.IsMine)
        {
            //Player is local
        }
        else
        {
            //Player is Remote, deactivate the scripts and object that should only be enabled for the local player
            for (int i = 0; i < localScripts.Length; i++)
            {
                localScripts[i].enabled = false;
            }
            for (int i = 0; i < localObjects.Length; i++)
            {
                localObjects[i].SetActive(false);
            }
        }
    }
Quá trình đồng bộ hóa thực tế được thực hiện thông qua lệnh gọi lại của PhotonView: OnPhotonSerializeView(PhotonStream Stream, PhotonMessageInfo info):
    public void OnPhotonSerializeView(PhotonStream stream, PhotonMessageInfo info)
    {
        if (stream.IsWriting)
        {
            //We own this player: send the others our data
            stream.SendNext(transform.position);
            stream.SendNext(transform.rotation);
        }
        else
        {
            //Network player, receive data
            latestPos = (Vector3)stream.ReceiveNext();
            latestRot = (Quaternion)stream.ReceiveNext();
        }
    }
Trong trường hợp này, chúng tôi chỉ gửi Vị trí và Xoay vòng của người chơi, nhưng bạn có thể sử dụng ví dụ trên để gửi bất kỳ giá trị nào cần thiết để đồng bộ hóa qua mạng ở tần suất cao.
Các giá trị nhận được sau đó sẽ được áp dụng trong void Update():
    // Update is called once per frame
    void Update()
    {
        if (!photonView.IsMine)
        {
            //Update remote player (smooth this, this looks good, at the cost of some accuracy)
            transform.position = Vector3.Lerp(transform.position, latestPos, Time.deltaTime * 5);
            transform.rotation = Quaternion.Lerp(transform.rotation, latestRot, Time.deltaTime * 5);
        }
    }
}
Đây là tập lệnh PUN2_PlayerSync.cs cuối cùng:
using UnityEngine;
using Photon.Pun;

public class PUN2_PlayerSync : MonoBehaviourPun, IPunObservable
{

    //List of the scripts that should only be active for the local player (ex. PlayerController, MouseLook etc.)
    public MonoBehaviour[] localScripts;
    //List of the GameObjects that should only be active for the local player (ex. Camera, AudioListener etc.)
    public GameObject[] localObjects;
    //Values that will be synced over network
    Vector3 latestPos;
    Quaternion latestRot;

    // Use this for initialization
    void Start()
    {
        if (photonView.IsMine)
        {
            //Player is local
        }
        else
        {
            //Player is Remote, deactivate the scripts and object that should only be enabled for the local player
            for (int i = 0; i < localScripts.Length; i++)
            {
                localScripts[i].enabled = false;
            }
            for (int i = 0; i < localObjects.Length; i++)
            {
                localObjects[i].SetActive(false);
            }
        }
    }

    public void OnPhotonSerializeView(PhotonStream stream, PhotonMessageInfo info)
    {
        if (stream.IsWriting)
        {
            //We own this player: send the others our data
            stream.SendNext(transform.position);
            stream.SendNext(transform.rotation);
        }
        else
        {
            //Network player, receive data
            latestPos = (Vector3)stream.ReceiveNext();
            latestRot = (Quaternion)stream.ReceiveNext();
        }
    }

    // Update is called once per frame
    void Update()
    {
        if (!photonView.IsMine)
        {
            //Update remote player (smooth this, this looks good, at the cost of some accuracy)
            transform.position = Vector3.Lerp(transform.position, latestPos, Time.deltaTime * 5);
            transform.rotation = Quaternion.Lerp(transform.rotation, latestRot, Time.deltaTime * 5);
        }
    }
}
Bây giờ hãy gán một tập lệnh mới được tạo:
- Đính kèm tập lệnh PUN2_PlayerSync vào PlayerInstance.
- Kéo và thả PUN2_PlayerSync vào Thành phần được quan sát của PhotonView.
- Gán SimplePlayerController cho "Local Scripts" và gán GameObjects (mà bạn muốn vô hiệu hóa đối với Người chơi từ xa) cho "Local Objects"
- Lưu PlayerInstance vào Prefab và di chuyển nó vào thư mục có tên Tài nguyên (Nếu không có thư mục đó, hãy tạo một thư mục). Bước này là cần thiết để có thể tạo ra các Đối tượng nhiều người chơi qua Mạng.

3. Tạo cấp độ trò chơi
GameLevel là Cảnh được tải sau khi tham gia Phòng và đó là nơi diễn ra tất cả hành động.
- Tạo một Cảnh mới và gọi nó là "GameLevel" (Hoặc nếu bạn muốn giữ một tên khác, hãy đảm bảo thay đổi tên trong dòng này PhotonNetwork.LoadLevel("GameLevel"); tại PUN2_GameLobby.cs).
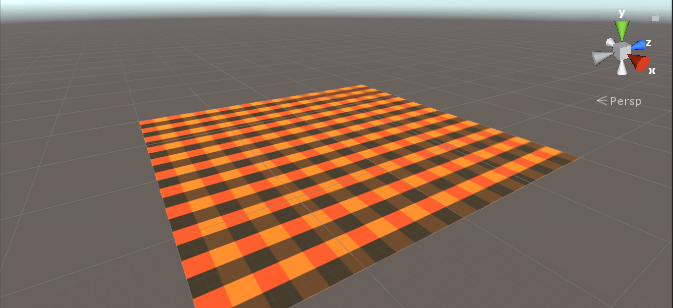
Trong trường hợp của tôi, tôi sẽ sử dụng một Cảnh đơn giản với Máy bay:
- Bây giờ hãy tạo một tập lệnh mới và gọi nó là PUN2_RoomController (Tập lệnh này sẽ xử lý logic bên trong Phòng, như sinh ra người chơi, hiển thị danh sách người chơi, v.v.).
Mở tập lệnh PUN2_RoomController:
Tương tự như PUN2_GameLobby, chúng tôi bắt đầu bằng cách thêm các không gian tên Photon và thay thế MonoBehaviour bằng MonoBehaviourPunCallbacks:
using UnityEngine;
using Photon.Pun;

public class PUN2_RoomController : MonoBehaviourPunCallbacks
Bây giờ hãy thêm các biến cần thiết:
    //Player instance prefab, must be located in the Resources folder
    public GameObject playerPrefab;
    //Player spawn point
    public Transform spawnPoint;
Để khởi tạo prefab Player, chúng tôi đang sử dụng PhotonNetwork.Instantiate:
    // Use this for initialization
    void Start()
    {
        //In case we started this demo with the wrong scene being active, simply load the menu scene
        if (PhotonNetwork.CurrentRoom == null)
        {
            Debug.Log("Is not in the room, returning back to Lobby");
            UnityEngine.SceneManagement.SceneManager.LoadScene("GameLobby");
            return;
        }

        //We're in a room. spawn a character for the local player. it gets synced by using PhotonNetwork.Instantiate
        PhotonNetwork.Instantiate(playerPrefab.name, spawnPoint.position, Quaternion.identity, 0);
    }
Và giao diện người dùng đơn giản với nút "Leave Room" và một số thành phần bổ sung như Tên phòng và danh sách Người chơi được kết nối:
    void OnGUI()
    {
        if (PhotonNetwork.CurrentRoom == null)
            return;

        //Leave this Room
        if (GUI.Button(new Rect(5, 5, 125, 25), "Leave Room"))
        {
            PhotonNetwork.LeaveRoom();
        }

        //Show the Room name
        GUI.Label(new Rect(135, 5, 200, 25), PhotonNetwork.CurrentRoom.Name);

        //Show the list of the players connected to this Room
        for (int i = 0; i < PhotonNetwork.PlayerList.Length; i++)
        {
            //Show if this player is a Master Client. There can only be one Master Client per Room so use this to define the authoritative logic etc.)
            string isMasterClient = (PhotonNetwork.PlayerList[i].IsMasterClient ? ": MasterClient" : "");
            GUI.Label(new Rect(5, 35 + 30 * i, 200, 25), PhotonNetwork.PlayerList[i].NickName + isMasterClient);
        }
    }
Cuối cùng, chúng tôi triển khai một lệnh gọi lại PhotonNetwork khác có tên OnLeftRoom() được gọi khi chúng tôi rời khỏi Phòng:
    public override void OnLeftRoom()
    {
        //We have left the Room, return back to the GameLobby
        UnityEngine.SceneManagement.SceneManager.LoadScene("GameLobby");
    }
Đây là tập lệnh PUN2_RoomController.cs cuối cùng:
using UnityEngine;
using Photon.Pun;

public class PUN2_RoomController : MonoBehaviourPunCallbacks
{

    //Player instance prefab, must be located in the Resources folder
    public GameObject playerPrefab;
    //Player spawn point
    public Transform spawnPoint;

    // Use this for initialization
    void Start()
    {
        //In case we started this demo with the wrong scene being active, simply load the menu scene
        if (PhotonNetwork.CurrentRoom == null)
        {
            Debug.Log("Is not in the room, returning back to Lobby");
            UnityEngine.SceneManagement.SceneManager.LoadScene("GameLobby");
            return;
        }

        //We're in a room. spawn a character for the local player. it gets synced by using PhotonNetwork.Instantiate
        PhotonNetwork.Instantiate(playerPrefab.name, spawnPoint.position, Quaternion.identity, 0);
    }

    void OnGUI()
    {
        if (PhotonNetwork.CurrentRoom == null)
            return;

        //Leave this Room
        if (GUI.Button(new Rect(5, 5, 125, 25), "Leave Room"))
        {
            PhotonNetwork.LeaveRoom();
        }

        //Show the Room name
        GUI.Label(new Rect(135, 5, 200, 25), PhotonNetwork.CurrentRoom.Name);

        //Show the list of the players connected to this Room
        for (int i = 0; i < PhotonNetwork.PlayerList.Length; i++)
        {
            //Show if this player is a Master Client. There can only be one Master Client per Room so use this to define the authoritative logic etc.)
            string isMasterClient = (PhotonNetwork.PlayerList[i].IsMasterClient ? ": MasterClient" : "");
            GUI.Label(new Rect(5, 35 + 30 * i, 200, 25), PhotonNetwork.PlayerList[i].NickName + isMasterClient);
        }
    }

    public override void OnLeftRoom()
    {
        //We have left the Room, return back to the GameLobby
        UnityEngine.SceneManagement.SceneManager.LoadScene("GameLobby");
    }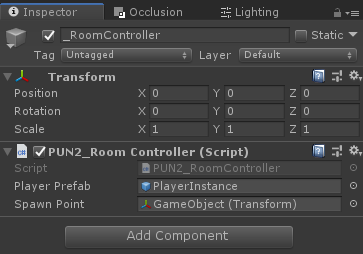
}- Tạo một GameObject mới trong cảnh 'GameLevel' và gọi nó "_RoomController"
- Đính kèm tập lệnh PUN2_RoomController vào đối tượng _RoomController
- Gán prefab PlayerInstance và SpawnPoint Transform cho nó sau đó lưu Cảnh
- Thêm cả MainMenu và GameLevel vào Cài đặt bản dựng.

4. Xây dựng bản thử nghiệm
Bây giờ là lúc tạo bản dựng và thử nghiệm nó:
Mọi thứ hoạt động như mong đợi!
Thưởng
RPC
Trong PUN 2, RPC là viết tắt của Gọi thủ tục từ xa, nó được dùng để gọi một chức năng trên các máy khách Từ xa ở trong cùng một phòng (Bạn có thể đọc thêm về nó tại đây).
RPC có nhiều công dụng, chẳng hạn như giả sử bạn cần gửi tin nhắn trò chuyện tới tất cả người chơi trong Phòng. Với RPC, thật dễ dàng để làm điều đó:
[PunRPC]
void ChatMessage(string senderName, string messageText)
{
    Debug.Log(string.Format("{0}: {1}", senderName, messageText));
}
Lưu ý [PunRPC] trước hàm. Thuộc tính này là cần thiết nếu bạn định gọi hàm thông qua RPC.
Để gọi các hàm được đánh dấu là RPC, bạn cần có PhotonView. Cuộc gọi ví dụ:
PhotonView photonView = PhotonView.Get(this);
photonView.RPC("ChatMessage", RpcTarget.All, PhotonNetwork.playerName, "Some message");
Mẹo chuyên nghiệp: Nếu bạn thay thế MonoBehaviour trong tập lệnh của mình bằng MonoBehaviourPun hoặc MonoBehaviourPunCallbacks thì bạn có thể bỏ qua PhotonView.Get() và sử dụng trực tiếp photonView.RPC().
Thuộc tính tùy chỉnh
Trong PUN 2, Thuộc tính tùy chỉnh là Hashtable có thể được chỉ định cho Người chơi hoặc Phòng.
Điều này hữu ích khi bạn cần đặt dữ liệu liên tục không cần thay đổi thường xuyên (ví dụ: Tên nhóm người chơi, Chế độ trò chơi trong phòng, v.v.).
Trước tiên, bạn phải xác định Hashtable, việc này được thực hiện bằng cách thêm dòng bên dưới vào đầu tập lệnh:
//Replace default Hashtables with Photon hashtables
using Hashtable = ExitGames.Client.Photon.Hashtable;
Ví dụ bên dưới đặt thuộc tính Phòng có tên "GameMode" và "AnotherProperty":
        //Set Room properties (Only Master Client is allowed to set Room properties)
        if (PhotonNetwork.IsMasterClient)
        {
            Hashtable setRoomProperties = new Hashtable();
            setRoomProperties.Add("GameMode", "FFA");
            setRoomProperties.Add("AnotherProperty", "Test");
            PhotonNetwork.CurrentRoom.SetCustomProperties(setRoomProperties);
        }

        //Will print "FFA"
        print((string)PhotonNetwork.CurrentRoom.CustomProperties["GameMode"]);
        //Will print "Test"
        print((string)PhotonNetwork.CurrentRoom.CustomProperties["AnotherProperty"]);
Thuộc tính người chơi được đặt tương tự:
            Hashtable setPlayerProperties = new Hashtable();
            setPlayerProperties.Add("PlayerHP", (float)100);
            PhotonNetwork.LocalPlayer.SetCustomProperties(setPlayerProperties);

            print((float)PhotonNetwork.LocalPlayer.CustomProperties["PlayerHP"]);
Để xóa một thuộc tính cụ thể, chỉ cần đặt giá trị của nó thành null.
            Hashtable setPlayerProperties = new Hashtable();
            setPlayerProperties.Add("PlayerHP", null);
            PhotonNetwork.LocalPlayer.SetCustomProperties(setPlayerProperties);
Hướng dẫn bổ sung: