Trò chơi nhỏ trong Unity | CUBEavoid
CUBEavoid là một trò chơi nhỏ được tạo ra trong Unity. Mã nguồn và thiết lập bên dưới.
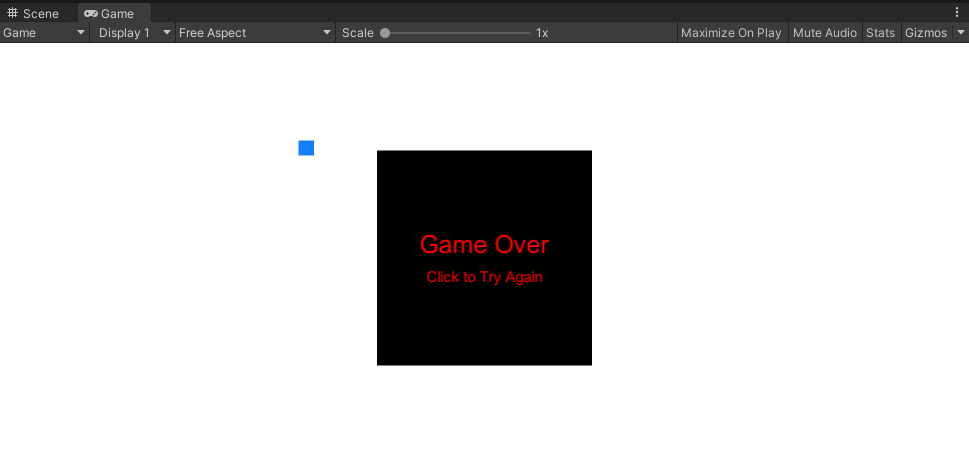
Mục tiêu là tránh khối lập phương nhỏ bằng cách thay đổi kích thước khối lập phương lớn bằng con trỏ chuột.
Bước 1: Tạo tất cả các tập lệnh cần thiết
- Tạo một tập lệnh mới, đặt tên là SC_PlayerCube.cs, xóa mọi thứ trong đó và dán mã bên dưới vào bên trong:
SC_PlayerCube.cs
using System.Collections;
using System.Collections.Generic;
using UnityEngine;
using UnityEngine.UI;

public class SC_PlayerCube : MonoBehaviour
{
    //Assign enemy mesh renderer
    public MeshRenderer enemy;
    public Text gameOverText;

    Transform thisT;
    MeshRenderer mr;

    //Global static variable
    public static bool GameOver = false;

    // Start is called before the first frame update
    void Start()
    {
        thisT = transform;
        mr = GetComponent<MeshRenderer>();
        gameOverText.enabled = false;
    }

    // Update is called once per frame
    void Update()
    {
        if (GameOver)
            return;

        if (gameOverText.enabled)
        {
            //Game has resumed, disable game over text
            gameOverText.enabled = false;
        }

        //Scale player cube with mouse movement
        Vector3 playerScale = (new Vector3(Screen.width / 2 - Input.mousePosition.x, 1, Screen.height / 2 - Input.mousePosition.y)).normalized * 10;
        //Keep Y scale at 10
        playerScale.y = 10;
        //Limit minimum X and Z scale to 0.1
        if (playerScale.x >= 0 && playerScale.x < 0.1f)
        {
            playerScale.x = 0.1f;
        }
        else if (playerScale.x < 0 && playerScale.x > -0.1f)
        {
            playerScale.x = -0.1f;
        }
        if (playerScale.z >= 0 && playerScale.z < 0.1f)
        {
            playerScale.z = 0.1f;
        }
        else if (playerScale.z < 0 && playerScale.z > -0.1f)
        {
            playerScale.z = -0.1f;
        }
        thisT.localScale = playerScale;

        //Check if enemy have intersected with the player, if so, stop the game
        if (mr.bounds.Intersects(enemy.bounds))
        {
            GameOver = true;
            gameOverText.enabled = true;
        }
    }
}- Tạo một tập lệnh mới, đặt tên là SC_EnemyCube.cs, xóa mọi thứ trong đó và dán mã bên dưới vào bên trong:
SC_EnemyCube.cs
using System.Collections;
using System.Collections.Generic;
using UnityEngine;

//This script controls enemy cube AI
public class SC_EnemyCube : MonoBehaviour
{
    //Private variables
    Camera mainCamera;
    float movementTime = 0;
    Vector3 startPoint;
    Vector3 endPoint;

    // Start is called before the first frame update
    void Start()
    {
        //Get camera tagged "MainCamera"
        mainCamera = Camera.main;
        GenerateStartEndPoint();
    }

    //Assign start and end points slightly outside the Camera view
    void GenerateStartEndPoint()
    {
        Vector3 relativeStart;
        Vector3 relativeEnd;

        //Randomly pick whether to go Left <-> Right or Up <-> Down
        if (Random.Range(-10, 10) > 0)
        {
            relativeStart = new Vector3(Random.Range(-10, 10) > 0 ? 1.1f : -0.1f, Random.Range(0.00f, 1.00f), mainCamera.transform.position.y);
            if (relativeStart.y > 0.4f && relativeStart.y < 0.6f)
            {
                if(relativeStart.y >= 0.5f)
                {
                    relativeStart.y = 0.6f;
                }
                else
                {
                    relativeStart.y = 0.4f;
                }
            }
            relativeEnd = relativeStart;
            relativeEnd.x = relativeEnd.x > 1 ? -0.1f : 1.1f;
        }
        else
        {
            relativeStart = new Vector3(Random.Range(0.00f, 1.00f), Random.Range(-10, 10) > 0 ? 1.1f : -0.1f, mainCamera.transform.position.y);
            if (relativeStart.x > 0.4f && relativeStart.x < 0.6f)
            {
                if (relativeStart.x >= 0.5f)
                {
                    relativeStart.x = 0.6f;
                }
                else
                {
                    relativeStart.x = 0.4f;
                }
            }
            relativeEnd = relativeStart;
            relativeEnd.y = relativeEnd.y > 1 ? -0.1f : 1.1f;
        }

        //Convert screen points to world points
        startPoint = mainCamera.ViewportToWorldPoint(relativeStart);
        endPoint = mainCamera.ViewportToWorldPoint(relativeEnd);

        //Reset movement time
        movementTime = 0;
    }

    // Update is called once per frame
    void Update()
    {
        //Game over, wait for click
        if (SC_PlayerCube.GameOver)
        {
            //Click to resume
            if (Input.GetMouseButtonDown(0))
            {
                SC_PlayerCube.GameOver = false;
                GenerateStartEndPoint();
            }
            else
            {
                return;
            }
        }

        //Move enemy from one side to the other
        if(movementTime < 1)
        {
            movementTime += Time.deltaTime * 0.5f;

            transform.position = Vector3.Lerp(startPoint, endPoint, movementTime);
        }
        else
        {
            //Re-generate start / end point
            GenerateStartEndPoint();
        }
    }
}
Bước 2: Thiết lập
Sau khi tạo xong 2 tập lệnh chính, chúng ta hãy tiến hành thiết lập trò chơi:
- Tạo một Cảnh mới nếu bạn chưa tạo
- Chọn Camera chính, thay đổi vị trí của nó thành (0, 10, 0) và xoay nó thành (90, 0, 0)
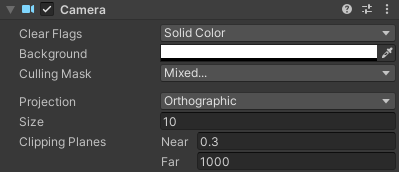
- Thay đổi các thuộc tính thành phần Camera của Camera chính: Xóa Cờ thành 'Solid Color', Nền thành 'white', Chiếu thành 'Orthographic' và Kích thước thành '10'
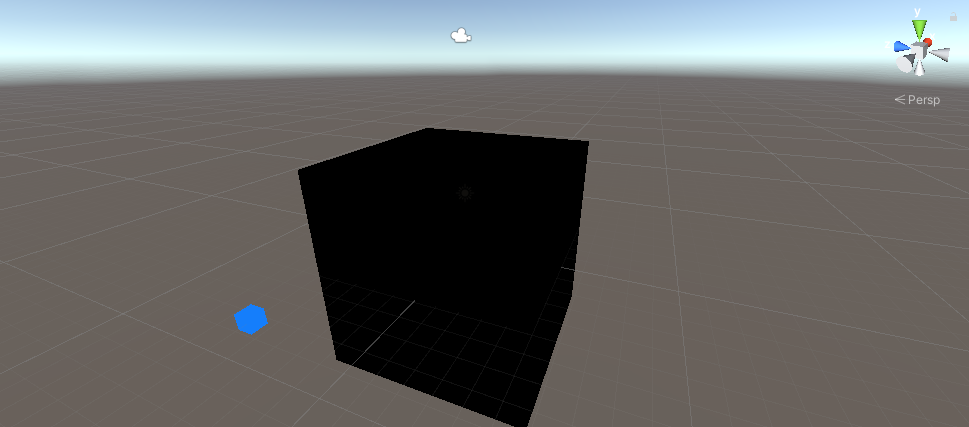
- Tạo Cube mới (Game Object -> 3D Object -> Cube) và đặt tên cho nó "Player"
- Thay đổi vị trí "Player" thành (0, 0, 0) và chia tỷ lệ thành (10, 10, 10)
- Tạo Material mới (Click chuột phải vào thư mục Project -> Create -> Material) và đặt tên cho nó "PlayerMaterial"
- Thay đổi "PlayerMaterial" Shader thành Unlit/Color và đổi màu của nó thành đen
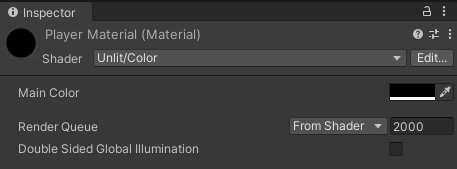
- Gán "PlayerMaterial" cho khối "Player"
- Nhân đôi khối "Player" và đổi tên thành "Enemy"
- Thay đổi tỷ lệ "Enemy" thành (0,7, 0,7, 0,7)
- Sao chép "PlayerMaterial" và đổi tên thành "EnemyMaterial"
- Đổi màu thập lục phân "EnemyMaterial" thành 157EFB
- Cuối cùng, gán "EnemyMaterial" cho "Enemy" Cube
Hãy cùng tạo một giao diện người dùng đơn giản:
- Tạo Văn bản UI mới (Đối tượng trò chơi -> UI -> Văn bản), đổi tên thành "GameOverText"
- Đảm bảo rằng căn chỉnh RectTransform cho Văn bản mới được đặt thành Giữa
- Đặt Văn bản Pos X và Pos Y thành 0
- Thay đổi chiều cao thành 100
- Đối với thành phần Văn bản, hãy đặt văn bản bên dưới (đảm bảo thuộc tính Văn bản phong phú được chọn):
Game Over
<size=15>Click to Try Again</size>- Đặt cỡ chữ thành 25
- Đặt căn chỉnh văn bản thành giữa
- Đặt màu chữ thành màu đỏ
Cuối cùng, chúng ta hãy gán các tập lệnh:
- Chọn khối lập phương "Player" và gán tập lệnh SC_PlayerCube cho nó
- Gán khối "Enemy" cho biến Enemy
- Gán "GameOverText" cho biến Game Over Text

- Chọn khối lập phương "Enemy" và gán tập lệnh SC_EnemyCube cho nó
Bây giờ khi nhấn Play, khối lập phương màu xanh sẽ bắt đầu di chuyển trên màn hình, bạn cần tránh điều này bằng cách thay đổi kích thước khối lập phương màu đen bằng cách sử dụng con trỏ chuột.
Bạn có thể thoải mái cải thiện trò chơi này theo bất kỳ cách nào.