Cần điều khiển nhập cảm ứng di động trong Unity
Để tạo một nhân vật có thể điều khiển được trong trò chơi dành cho thiết bị di động, người ta phải thêm các nút được thể hiện trực quan trên màn hình và phản hồi với đầu vào cảm ứng.
Trong hướng dẫn này, tôi sẽ trình bày cách tạo nút giống cần điều khiển trong Unity, nút này chủ yếu phù hợp để điều khiển chuyển động trên điện thoại màn hình cảm ứng.

Bạn cũng có thể sử dụng ví dụ bên dưới để thêm nhiều nút và cần điều khiển hơn. Vì vậy, hãy bắt đầu!
Bước 1: Tạo tất cả các tập lệnh cần thiết
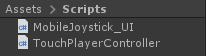
- Tạo hai tập lệnh C# bằng mã nguồn bên dưới
MobileJoystick_UI.cs
using UnityEngine;
using UnityEngine.UI;

public class MobileJoystick_UI : MonoBehaviour
{

    //Mobile controller graphics
    public Sprite navigationCircle;
    public Sprite navigationButton;
    //Use this in your movement script for the input control
    public Vector2 moveDirection;
    //Joystick components size
    int circleSize = 120;
    int buttonSize = 100;
    //How far the joystick should be placed from the side of the screen
    int marginLeft = 100;
    //How far the joystick should be placed from the bottom of the screen
    int marginBottom = 100;

    Canvas mainCanvas;

    //Mobile movement
    [System.Serializable]
    public class JoystickButton
    {
        public Image backgroundCircle;
        public Image mainButton;
        public Rect defaultArea;
        public Vector2 touchOffset;
        public Vector2 currentTouchPos;
        public int touchID;
        public bool isActive = false;
    }

    //Move joystick data
    JoystickButton moveTouch = new JoystickButton();

    public static MobileJoystick_UI instance;

    // Start is called before the first frame update
    void Start()
    {
        if (instance != null)
        {
            //There is another instance already present, remove this one
            Destroy(gameObject);
            return;
        }
        //Assign this instance to a static variable so you can access the movement direction directly at MobileJoystick_UI.instance.moveDirection
        instance = this;

        //This function will initialize canvas element along with the joystick button
        GameObject tmpObj = new GameObject("Canvas");
        tmpObj.transform.position = Vector3.zero;
        mainCanvas = tmpObj.AddComponent<Canvas>();
        mainCanvas.renderMode = RenderMode.ScreenSpaceOverlay;
        mainCanvas.pixelPerfect = true;

        //Add Canvas Scaler component
        CanvasScaler canvasScaled = tmpObj.AddComponent<CanvasScaler>();
        canvasScaled.scaleFactor = 1;
        canvasScaled.referencePixelsPerUnit = 100;

        //Add Graphic Raycaster element
        tmpObj.AddComponent<GraphicRaycaster>();

        //Setup navigation background
        GameObject cntrlTmpObj = new GameObject("Movement Circle");
        cntrlTmpObj.transform.position = Vector3.zero;
        cntrlTmpObj.transform.parent = tmpObj.transform;
        moveTouch.backgroundCircle = cntrlTmpObj.AddComponent<Image>();
        moveTouch.backgroundCircle.sprite = navigationCircle;
        moveTouch.backgroundCircle.rectTransform.anchorMin = new Vector2(0, 0);
        moveTouch.backgroundCircle.rectTransform.anchorMax = new Vector2(0, 0);
        moveTouch.backgroundCircle.rectTransform.sizeDelta = new Vector2(circleSize, circleSize);
        moveTouch.backgroundCircle.rectTransform.pivot = new Vector2(0, 0);
        moveTouch.backgroundCircle.rectTransform.position = new Vector3(marginLeft, marginBottom, 0);

        //Navigation button
        cntrlTmpObj = new GameObject("Movement Button");
        cntrlTmpObj.transform.position = Vector3.zero;
        cntrlTmpObj.transform.parent = tmpObj.transform;
        moveTouch.mainButton = cntrlTmpObj.AddComponent<Image>();
        moveTouch.mainButton.sprite = navigationButton;
        moveTouch.mainButton.rectTransform.anchorMin = new Vector2(0, 0);
        moveTouch.mainButton.rectTransform.anchorMax = new Vector2(0, 0);
        moveTouch.mainButton.rectTransform.sizeDelta = new Vector2(buttonSize, buttonSize);
        moveTouch.mainButton.rectTransform.pivot = new Vector2(0, 0);
        moveTouch.mainButton.rectTransform.position = new Vector3(marginLeft + (circleSize - buttonSize) / 2, marginBottom + (circleSize - buttonSize) / 2, 0);

        //Save the default location of the joystick button to be used later for input detection
        moveTouch.defaultArea = new Rect(moveTouch.mainButton.rectTransform.position.x,
            moveTouch.mainButton.rectTransform.position.y,
            moveTouch.mainButton.rectTransform.sizeDelta.x,
            moveTouch.mainButton.rectTransform.sizeDelta.y);
    }

    // Update is called once per frame
    void Update()
    {
        //Handle joystick movement
#if (UNITY_ANDROID || UNITY_IOS || UNITY_WP8 || UNITY_WP8_1) && !UNITY_EDITOR
        //Mobile touch input
        for (var i = 0; i < Input.touchCount; ++i)
        {
            Touch touch = Input.GetTouch(i);

            if (touch.phase == TouchPhase.Began)
            {
                MobileButtonsCheck(new Vector2(touch.position.x, Screen.height - touch.position.y), touch.fingerId);
            }

            if (touch.phase == TouchPhase.Moved )
            {
                if(moveTouch.isActive && moveTouch.touchID == touch.fingerId)
                {
                    moveTouch.currentTouchPos = touch.position;
                }
            }

            if (touch.phase == TouchPhase.Ended || touch.phase == TouchPhase.Canceled)
            {
                MobileButtonStop(touch.fingerId);
            }
        }
#else
        //Desktop mouse input for editor testing
        if (Input.GetMouseButtonDown(0))
        {
            MobileButtonsCheck(new Vector2(Input.mousePosition.x, Screen.height - Input.mousePosition.y), -1);
        }

        if (Input.GetMouseButtonUp(0))
        {
            MobileButtonStop(-1);
        }

        moveTouch.currentTouchPos = Input.mousePosition;
#endif

        //Moving
        if (moveTouch.isActive)
        {
            moveTouch.mainButton.rectTransform.position = new Vector3(moveTouch.currentTouchPos.x - moveTouch.touchOffset.x, moveTouch.currentTouchPos.y - moveTouch.touchOffset.y);
            moveDirection.x = moveTouch.mainButton.rectTransform.position.x - moveTouch.defaultArea.x;
            moveDirection.y = moveTouch.mainButton.rectTransform.position.y - moveTouch.defaultArea.y;

            if (Mathf.Abs(moveDirection.x) < 19)
            {
                moveDirection.x = 0;
            }
            else
            {
                moveDirection.x = Mathf.Clamp(moveDirection.x / 75.000f, -1.000f, 1.000f);
            }

            if (Mathf.Abs(moveDirection.y) < 19)
            {
                moveDirection.y = 0;
            }
            else
            {
                moveDirection.y = Mathf.Clamp(moveDirection.y / 75.000f, -1.000f, 1.000f);
            }
        }
        else
        {
            moveTouch.mainButton.rectTransform.position = new Vector3(moveTouch.defaultArea.x, moveTouch.defaultArea.y);
            moveDirection = Vector2.zero;
        }
    }

    //Here we check if the clicked/tapped position is inside the joystick button
    void MobileButtonsCheck(Vector2 touchPos, int touchID)
    {
        //Move controller
        if (moveTouch.defaultArea.Contains(new Vector2(touchPos.x, Screen.height - touchPos.y)) && !moveTouch.isActive)
        {
            moveTouch.isActive = true;
            moveTouch.touchOffset = new Vector2(touchPos.x - moveTouch.defaultArea.x, Screen.height - touchPos.y - moveTouch.defaultArea.y);
            moveTouch.currentTouchPos = new Vector2(touchPos.x, Screen.height - touchPos.y);
            moveTouch.touchID = touchID;
        }
    }

    //Here we release the previously active joystick if we release the mouse button/finger from the screen
    void MobileButtonStop(int touchID)
    {
        if (moveTouch.isActive && moveTouch.touchID == touchID)
        {
            moveTouch.isActive = false;
            moveTouch.touchOffset = Vector2.zero;
            moveTouch.touchID = -1;
        }
    }
}
TouchPlayerController.cs
using UnityEngine;

public class TouchPlayerController : MonoBehaviour
{

    // Update is called once per frame
    void Update()
    {
        //Move Front/Back
        if (MobileJoystick_UI.instance.moveDirection.y != 0)
        {
            transform.Translate(transform.forward * Time.deltaTime * 2.45f * MobileJoystick_UI.instance.moveDirection.y, Space.World);
        }

        //Rotate Left/Right
        if (MobileJoystick_UI.instance.moveDirection.x != 0)
        {
            transform.Rotate(new Vector3(0, 14, 0) * Time.deltaTime * 4.5f * MobileJoystick_UI.instance.moveDirection.x, Space.Self);
        }
    }
}
Bước 2: Thiết lập một cảnh đơn giản bằng cách sử dụng các tập lệnh ở trên
- Tạo cảnh mới
- Tạo một GameObject mới và gọi nó '_TouchInput'
- Đính kèm tập lệnh MobileJoystick_UI vào nó
- Gán các biến 'Navigation Circle' và 'Navigation button'.
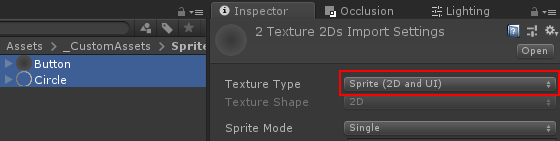
Bạn có thể sử dụng các sprite bên dưới hoặc bấm vào đây:


- Sau khi nhập chúng vào Unity, hãy đảm bảo thay đổi loại Họa tiết thành 'Sprite (2D and UI)'
Bước 3: Thiết lập phiên bản trình phát
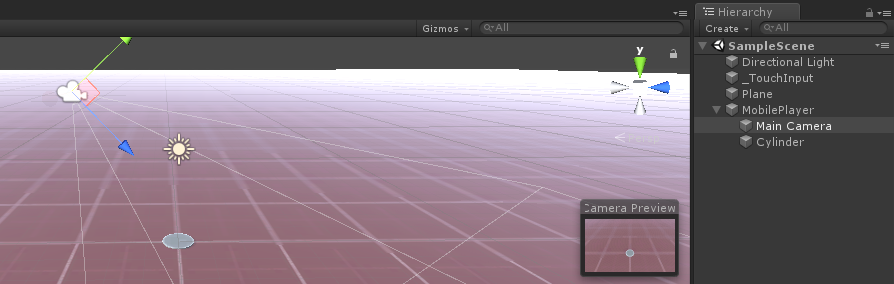
Cuối cùng, chúng tôi thiết lập phiên bản trình phát (Trong trường hợp của tôi, nó sẽ là một GameObject đơn giản có Hình trụ bên trong):
- Tạo một GameObject mới và gọi nó 'MobilePlayer'
- Đính kèm tập lệnh TouchPlayerController vào nó
- Tạo một Hình trụ mới và giảm chiều cao của nó xuống cho đến khi nó trông gần như phẳng (Trong trường hợp của tôi, tỷ lệ là (x: 1 y: 0.0142 z: 1) )
- Di chuyển Hình trụ bên trong 'MobilePlayer' GameObject
- Với mục đích thử nghiệm, bạn cũng có thể di chuyển Camera chính bên trong 'MobilePlayer' và xoay nó để nó hướng vào người chơi như thế này:
Bây giờ là lúc nhấn Play và xem mọi thứ có hoạt động ổn không.
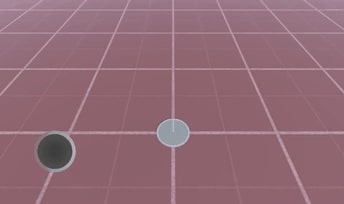
Mọi thứ hoạt động như mong đợi! Người chơi được điều khiển bằng cách di chuyển nút điều khiển xung quanh.
Tập lệnh MobileJoystick_UI hỗ trợ cả đầu vào cảm ứng trên thiết bị di động và nhấp chuột (nếu bạn chơi trong trình chỉnh sửa).